What is Wi-Fi and how to create a home network with your own hands. Local Network Via WiFi Router - How to Set Up
Just a few years ago, setting up a local network through the DIR 300 router in Windows 7 and Windows 8 could only be done by a specialist. Today, thanks to full automation, this simple operation can be performed even by an inexperienced user. All you need for this is a computer, accessible Internet and a router.
Connecting a router
When a common communication channel can be used for several home devices, but only one wire is available, in this case a router is simply irreplaceable.
A router is a device with an individual power supply, when connected to which, each computer, regardless of the number, receives free access to the Internet.
You can connect several devices to the router at the same time: an e-reader, a smartphone, a set-top box, a laptop, a computer and a tablet.
Connecting gadgets will provide each of them with Internet access and help quickly exchange information.
Connection to the router can be made using two methods:
- wired;
- wireless.
It depends on the router model (Wi-Fi availability) and the user’s desires. For example, setting up a local network through a dir 30 router is not a difficult job that even an inexperienced user can do.
Instructions for wired connection:
- If necessary, properly crimp the UTP network cable;
- connect the router to the power supply;
- connect gadget cables to it;
- configure network functions.
A connection through a router not only creates a network between several computers, but also protects them from some damage (for example: wear and tear of the provider cable, breakage of this cable, lightning strikes).
A cable from the provider is inserted into the corresponding socket of the router. Then the user’s IP address, secondary network mask, main gateway, and two DNS servers (preferred and alternative) are specified in the router settings. Additionally, you can copy the repeat MAC address of the network card, password and network login.
Basically, router models are equipped with four sockets for connection. Each of them is carried out according to a single algorithm. Then you should check and configure network connections.
Video: How to connect a router
Checking physical connection
Having completed the necessary work, you should make sure that the switches and cables are working correctly, that is, there is a functional physical connection between the gadgets.
To do this, you will need a ping utility that checks the stability of the TCP/IP configuration and tests other host connections. The process consists of sending packet data of a limited volume to the address specified in the settings.
According to the rules, upon receiving an information packet, each network device immediately sends a response. The communication line between configurations is broken or missing if a response does not arrive within a certain time.
Before using the ping utility, you should:
- computers that are being checked for connectivity must be turned on;
- execute the Start/Run commands;
- enter the data of the ping 127.0.0.1 command, which allows you to check the functionality of the utility itself;
- replace the address in the command with the address of the local computer, this will allow you to check the operation of the network card;
- check the target computer (for example, ping 10.20.16.1), if the response is the line “Request timeout exceeded,” then this is a confirmation of a faulty switch or cable.
You can send a large number of packets to the network using the – t switch, separated from the ping command by a space.
How to set up a local network via a wi fi router
A Wi-Fi router is needed to unite two or more devices into one network, to open shared access to various folders, files, disks, and to be able to exchange information.
Having in stock:
- Wi-Fi router connected to a virtual network, with an automated IP and DNS system:
- a computer with a wired Internet connection;
- a computer with an operating system similar to the first one, but with a Wi-Fi connection.
We start connecting via a wifi router in Windows 7
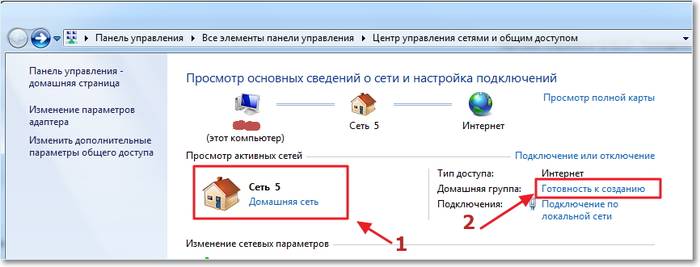
First, you should check the connection with the ping command. To do this, find the router settings in the browser. We perform the necessary transitions through the menu and search in a few clicks. If in the end, after pressing the “Enter” key, the exchange of packets between devices begins, then the connection is working.

It is necessary to disable your antivirus, Windows Firewall, and firewalls the first time you experience network connection problems. After this, you can begin to configure the existing network.
After checking the working groups of gadgets, we set the name or change it, which must be done, if any. You should also cancel the password request.
The work is done, the network is configured. All that remains is to restart all computers.
Local network in Windows 7
In order to configure the adapter parameters (mask and IP), we perform the necessary steps, after which the entire range of Internet connections is displayed on the screen:
- you should select one of them corresponding to the adapter of the connected computer;
- in Properties we find “Internet Protocol version 4 (TCP/IPv4)”, which is used to connect;
- then you should enter the IP address.
You should pay attention to the fact that the last digit in it is the device number, that is, depending on how many of them are connected in a particular network, enter 1 for the first, 2 for the second, and so on.
The subnet mask is set automatically after pressing the “Subnet Mask” button.

Now all gadgets connected to the network will appear in the Network menu, but each of them will be accessed based on the settings specified in the Network and Sharing Center.
Document sharing
To open shared access to documents, on computer 1, select the desired folder and open access in the properties. To allow content changes by other network users, you must allow access again.
In the network environment of computer 2, find all the computers that are in the workgroup and click the link.
After these steps, a shared folder will be displayed on computer 1.
Two network routers
Sometimes it is necessary to connect two routers. You can also do this yourself.
First, let's prepare a network cable and decide what effect we want to get as a result of the actions: connecting existing local networks, a single Internet access point, connecting devices, wired and wireless, to a second router.
Using Wi-Fi or a network cable, you can connect two routers to the network.
When using a cable connection, one end is connected to the main device (LAN), and the other is inserted into the second (WAN). Having received the necessary data about the request, we complete the work by checking the box for automatically obtaining IP addresses in the second router.
Using a cable-free information transmission network to connect routers, you just need to enter the settings of the second router and, having started searching for wireless networks, join the Wi-Fi network created by that time by the first device. Next, you should do the same steps as during a wired connection.
Local network in Windows 8
The new Windows 8 system makes it possible to watch movies, play games, talk with friends, work in Office, and search for your favorite applications in a specially created Windows Store right from the screen.
To configure, go to:
- in the Start menu, displayed on the gadget screen already when Windows 8 loads;
- Next you should go to connections in a few clicks, for Windows 8 this is Ethernet;
- In the properties we find “Internet Protocol version 4 TCP/IPv4”;
- open the General tab;
- select “Obtain an IP address automatically” and “Obtain DNS servers automatically.”
We agree with the “Ok” button, and with this action we complete the setup of the local network of Windows 8 OS. You can check the start of the connection and Internet access by simply clicking on the “Connection” icon.

It is striking that setting up a local network via a router in Windows 8 and earlier versions of the OS are similar. The only difference between them is entering the settings. But 8 users have already gotten comfortable with this item, using hotkeys and the search engine. Having coped with the search for the control panel, the owner of Windows 8 performs all other actions similarly to previous versions.
Connection and testing
When connecting and setting up a wireless connection, you should check the basic settings:

First you need to make sure that the Internet is working and connected. If the indicator on the router panel does not light up, you will need to upgrade the firmware. Download the latest version from the manufacturer's website. If the cable connection does not make sufficient contact, the connector must be re-crimped. If everything is fine, then move on to the next step. Let's make sure there is a connection between the devices; for this we do a ping.
- Launch the router menu and write down the IP address of the other device.
- Enter 192.168.1.1 in your web browser.
- Let's go to the router settings.
- Let's go to DHCP.
- From the list, select the network address of another PC.
- Click start, then search and enter cmd. This is access to the command line.
- Launch cmd.exe.
- In the empty line, enter the ping command and the data of the second computer.
- We confirm the action.
- After this, packet data exchange starts. This means that the procedure was completed correctly and the computers detected each other. You can proceed to setting up the network.
Advice. If no data is exchanged when pinging, then the router is not detecting the network. Perhaps it's an antivirus issue. You need to disable it or allow sharing in the settings. It is also worth disabling the built-in Windows Defender. Then repeat the ping operation.
Setting up a home network
For security purposes, all devices intended to be connected by one network must belong to a common group so that an ill-wisher cannot extract or infect information stored on devices from your group. We do the following:
- In PC properties, find additional settings, click on the name. Click the “Change” button, make changes to the group and, if you consider it necessary, you can change the name;
- Confirm the process by clicking “Ok” and restart the computer;
- repeat this operation on all devices;
- go to network management and find out what type of networks your network belongs to. If “Home network” is selected, then everything is in order, if not, then change the choice;
- Click “Ready to create”;
- “Create a home group”;

- check the boxes for those components to which you plan to share access;
- agree with the choice;
- Click “Change advanced sharing settings.” Disable the password request;
- in the “General” tab we find the same item and similarly disable the password request;
- Be sure to save the new settings;
- restart the computers.
Network setup is complete. Let's make sure that there are computers on the network. We go to the Network through my computer. If everything is done correctly, then all devices using the router should be displayed, both wired and wireless. Now you can access another computer in the group via your home network, but you will only have access to the Shared Folder. To be able to view folders or individual files, you need to make additional settings.
Advice. Be sure to set a strong password for your router so that no one can access your files. Simple passwords are often hacked.
Setting up file access
To open access to certain files on your computer, you need to go to the folder and click the Sharing tab at the top. A new window will appear, in it you should check the checkbox opposite the opening. Now all devices connected to your home network can view this folder.
After setting up the network, write all the data into a file and store it on your computer so as not to configure everything again.

Connecting several routers
Sometimes situations arise when you need to connect two routers into a network. Routers can connect two networks or serve as a common access point to the World Wide Web. Or one of the routers services the devices connected to it: printers, cameras, televisions.
Two devices are connected by cable or via Wi-Fi.
- Connect the cable to the LAN connector of another router, and connect the second router via the WAN port. Now you need to configure the first router, which will be the main one. In the settings we enable DHCP. And in the address of the second router we cancel the automatic receipt of the address.
- When connecting via Wi-Fi for another device, disable the search for wireless networks. Then we enable DHCP and configure automatic receipt of the address.
Connecting other gadgets to the network
You can connect other laptops or . Let's look at it in order.

- To connect your laptop, click on the network icon located at the bottom of the screen. From the list, select the name of your home Wi-fi and click on it. If you want the device to automatically detect the network and connect to it, check the box next to “Connect automatically.” The system will require a password. Enter it. If there are no problems, the network will connect.
- A smartphone or tablet is connected in a similar way. Go to settings and turn on Wi-Fi. Select your home network from the list of available connections. Click on it and enter the password. The status will change to “Connected”. Now from the gadget you can view documents located on your computer and print documents if the printer is connected to one of the devices.
To set up a home network you don’t need to be a genius and have remarkable knowledge. Just follow the instructions and you will succeed.
How to set up a local network: video
When using several computers at home, you may want to combine them into one network, but you should consider using a router for more comprehensive routing and a single connection to the Internet. This solution will allow you to get several advantages:
- ease of connecting multiple devices to the Internet;
- using network folders instead of flash cards and removable hard drives;
- using a network peripheral device (printer, scanner);
- using one antivirus program license on several devices, or centralized management of several antiviruses.
Of course, to create a network, you will need a router. You can learn how to choose the right router for your home.
After you have decided on a router, you should make some kind of marking, that is, determine where each of the network devices will be installed. This must be done in order to correctly place the router.
Important! When using wireless equipment, try not to interfere with the signal path from the router to the client. In the case of a distributed network (if subscribers are located in different rooms), it is recommended to install the router so that the computers are equidistant from it. In the case of using a wired transmission medium, approximate marking of the location of all network participants will allow you to prepare switching cords of the required length in advance (you can read about making network cords) .
When choosing a Wi-Fi router, do not forget to check whether all computers have a wireless network card.
When setting up a home network, for each subscriber, you should use a network address from any private range, that is, an IP that is not used on the Internet:
- 10.0.0.0 – 10.255.255.255;
- 100.64.0.0 – 100.127.255.255;
- 172.16.0.0 – 172.31.255.255;
- 192.168.0.0 – 192.168.255.255.
On a note! If you have not configured subscriber addresses manually, and your router does not have the “DHCP” operating mode (from the English Dynamic Host Configuration Protocol, automatic assignment protocolIP addresses to the host), then network clients will be assigned an address from a special stack "APIPA" (from English.Automatic Private IP AddressingIP private band), which includes networks 169.254.0.0 - 169.254.255.255, and there is no guarantee that devices connected to the network will have access to each other. It is recommended to configure network cards manually.

When setting up addresses, do not forget about network masks - these are additional identifiers of a network address. It is used to delimit subnets and is a group of 32 bits, just like IP, but without alternating zeros and ones.
On a note! An IP address, as you know, consists of four decimal numbers in the range 0 – 255, for example 192.168.0.3. However, the computer perceives information precisely as bits, that is, in the binary number system, respectively, the specified address is seen by the machine as 11000000.10101000.00000000.00000011. As you can see, there is an alternation of zeros and ones. The subnet mask is also entered in the decimal system, but alternations in it are unacceptable - the left side always consists of ones, the right side is padded with zeros up to 32 bits, for example, 255.255.255.192 will be perceived as 11111111.11111111.11111111.11000000.
A subnet mask can be used to restrict access to your network. The limit values for the number of devices can be calculated, but it is quite difficult, so it is better to use a special table or calculator. Let's assume that you are using a wireless router, and there will be a total of five devices (including the router) on the network.
Step 1. Go to the site with the IP calculator.

Step 2. Fill in the required fields. The source network can be any private IP. In the “Subnetwork sizes” field, indicate the number of subscribers in your network. Leave the mask column as default. To process the data, click the “Calculate” button.

Step 3. Check out the calculation results. The calculator automatically selects the subnet mask as close as possible to the required one. Note the Required Size column, it contains the given hosts value and "+2". These two additional addresses include the address of the network itself (in this case 10.19.1.0) and the broadcast address (for broadcasting to all addresses on the network, in this case 10.19.1.7).

On a note! Of course, since all information in computers is processed in a binary system, the number of computers in a subnet should be a power of two. The closest value that can accommodate 5 devices is 2 3, that is, 8.
Setting up the router
TP-Link was selected as the router. The main methods for connecting to routers are described. To set up a home network, the most important thing is setting up DHCP, so we’ll look at it in more detail.
Step 1. Start the DHCP service. Enter the starting and ending addresses found using the calculator. Don't forget to specify the IP lease period (this parameter provides an additional guarantee of security, since the IP of each device changes after a specified period of time). You should specify the router itself as the default gateway. Specifying a domain for a workgroup is not relevant. The DNS server in domain networks is specified by the domain controller; for a home network, it is recommended to use the address 8.8.8.8 (Google's DNS server).

Step 2. The “Client List” option contains records about each network subscriber, namely, mapping the MAC address to the IP address.

Step 3.“Address reservation” is used to exclude the rental of special network components, for example, printers.

Setting up a network connection Windows 7
After assigning network addresses to all devices, including the router, you can begin to form a network group.
Step 1. Launch the “Run” window by pressing the “Win + R” buttons on the keyboard.

Step 2. Enter the line "sysdm.cpl".

Step 3. Check the network group or domain name. All devices must belong to the same group.

Step 4.

Step 5.

Important!
Step 6. Enter network management by right-clicking on the network connections icon.

Step 7 To configure connection options, use the link for changing network access parameters in the left frame.

Step 8 Expand the list of home network profile options.

Step 9 Check the recommended options. Network discovery must be enabled in order for multiple network devices to “see” each other. Unified access to the printer is enabled as needed. Access to directories is configured on each individual computer. Encryption settings in a home group, where all devices are known to you, are irrelevant. It is better to leave connections on your home network under control of the operating system.

Step 10 To open public access to a directory, go to its “Properties”. Call up the menu with the right button and click on the corresponding line.

Step 11 In the settings window, switch to the “Access” tab.

Step 12 To configure, use the “Sharing...” button.

Step 13 To restrict access, you can specify specific users (used in a domain) or select the “Everyone” option (for a workgroup).

Step 14 To “share” (from the English share – share) a network printer, go through the start menu to “Devices and Printers”.
Step 15 Select the device that should be made network and enter its properties. Call up the menu with the right button and select the appropriate line.

Step 16 In the dialog box, go to the “Access” tab.

Step 17 To configure, use the “Sharing Settings” option.

Important! You must have administrator rights.
Step 18 Check the options to enable printer access. When working in a domain, it is also recommended to check the “Add to Active Directory” option to make it easier to find a network device.

Step 19 To connect to a network printer or folder, you must find in your network environment the computer on which you configured access to these resources.

Step 20. Upon logging into the network computer, you will be provided with a list of available resources.

Step 21 To connect the printer on the subscriber’s PC, you need to call up the context menu and select “Connect...”, after automatic driver installation the network device will be available on the subscriber’s computer.

Important! If the bit depth of the server computer and the subscriber computer are different, additional ones may be required for the printer to function correctly.
Step 22 To facilitate access to shared resources, you can configure a network resource on the subscriber computer as a network drive. This can be done through the menu by selecting “Map network drive...”.

Step 23 In the wizard that opens, specify the letter that will correspond to the drive. Pay attention to the “Restore at login” option. If it is inactive, the disk will turn off every time you reboot or turn off the power.

Step 24 Once the installation is complete, the network folder will be accessible like a regular hard drive through “My Computer”.

Setting up a Windows 10 network
Step 1. Call up the system list using the “Win+X” combination. In the window that opens, enter the “System” section.

Step 2. To configure connection options, use the link for changing sharing settings in the left frame of the window.

Step 3. In the window that opens, switch to the “Computer name” tab.

Step 4. Check the workgroup or domain name. All devices must belong to the same group.

Step 5. To switch to another group, select the “Change...” button.

To switch to a friend’s group, click the “Edit...” button.
Step 6. Change the station name and connect to the desired group or domain.
Important! Changes will only be applied after a reboot.
On a note! Folder access settings are similar to those for Windows 7.
Conclusion
We looked at the main aspects of setting up a network for operating systems of the Windows family. To increase information security, do not forget to calculate the subnet mask and use the DHCP service.
Video - How to set up a network between computers via a router
VKontakte Facebook Odnoklassniki
Gone are the days when a single home computer was the pride of the owner and the center of leisure for the whole family.
The pace of development of electronics leads to the fact that soon there will not be a single household item that does not have a processor installed, albeit small. And even now in every home there are five or two devices capable of storing, processing and transmitting information. And sooner or later there comes a time when we, tired of running with a flash drive from one device to another, begin to think that it would be nice to connect them with each other.
Of course, ideally it would be to think through the composition of the equipment in advance so that incompatibility problems and unnecessary expenses do not arise. But in practice, it often happens that a host of different devices are already present in your home and you need to somehow connect them together, minimizing effort and costs as much as possible.
Photo from the site hardnsoft.ru
The optimal cost/effectiveness ratio is a wired Ethernet network. Of course, it requires drilling into walls to lay the cable, but it works very reliably and is unrivaled in terms of connection speed, especially if you use ports with a speed of 1 Gb/s. And if all future nodes (that’s what network nodes are called) are equipped with an RJ-45 port and rarely move around the apartment beyond the designated areas, then this will be the best solution. All that is required to create a network is a few tens of meters of twisted pair cable and a simple router or switch.
But we will consider a more complex case, when some devices are constantly moving (netbooks, laptops or tablets - whoever has what), others do not have an Ethernet port, but are equipped with a Wi-Fi module (PDAs or communicators), and others have neither , nor anything else (HD media player or external drive). You can be sure that building a network in any case is not something outstanding and is quite within the capabilities of everyone.
Photo from the site hardnsoft.ru
Types of Wi-Fi networks
Obviously, at home, the only possible universal solution will be a wireless network based on Wi-Fi. First, you need to decide on the basis of which Wi-Fi standard the future network should be designed. At the moment, there are four varieties of them: 802.11a, 802.11b, 802.11g and 802.11n, colloquially called a, b, g, n - after the last letter.
The most common is b, which is also the slowest: the transmission channel speed does not exceed 11 Mb/s (compare with 100 or 1000 Mb/s for Ethernet). Moreover, if for Ethernet the real data transfer speed approaches the channel speed, then for a wireless network it is usually about two times lower (see the article “In the city “n” in this issue).
A and g have higher speeds - up to 54 Mb/s, but a operates at a different frequency - 5 GHz, which is not certified in Russia, unlike b and g, which operate at 2.4 GHz. This speed is sufficient for browsing the Internet and most other applications, so we will choose 802.11g as the basis for our network. As a rule, every device based on the g standard also supports b, which will ensure compatibility with less advanced devices such as PDAs.
If the speed of 20-30 Mb/s (i.e. only about 3 Mb/s) seems insufficient (for example, you plan to transfer large files over the network, such as high-definition movies, etc.), you will have to fork out n - the most modern and expensive standard, allowing you to achieve speeds of as much as 300 Mb/s. There are two versions of it - at 5 and 2.4 GHz, the first of which is also not certified, but is more effective, since it uses the currently almost unused frequency range.
Therefore, the most demanding users can be advised to purchase dual-band devices at their own risk (taking into account the very limited range of the transmitter - about several tens of meters, you can see that the risk is small). But here a compatibility problem may arise, because not all 802.11n devices operate at 5 GHz (this means high-speed mode n, since they still support modes b and g).
Sharing resources
One of the main advantages of the network is the ability to share access to information (for example, movies, music or documents). A similar problem can be solved in several ways. One of them is to share folders on one of the computers using standard operating system tools (for security, you can limit yourself to the “Read Only” mode). This method is quite simple, but requires constant operation of the computer with general data. Similarly, you can make a locally connected printer or MFP publicly available.
Looking ahead, let's say that routers with built-in USB ports provide more convenience. They allow you to connect an external hard drive or printer, making them available to each network node, and even organize a torrent download. It will be able to work completely autonomously and around the clock (it is not customary to turn off the router, and its power consumption is quite insignificant), download files not only from distributions, but also from most popular file hosting services (the latter usually requires installing modified firmware, but this is beyond the scope of this article ).
Wireless routers equipped with USB ports can also provide network access to external storage devices in the form of an FTP server. This method is a little more complicated in settings (they are performed through the router’s web interface), but more universal, does not depend on the computer, however, it forces you to convert the file system of the external hard drive, for example, to EXT.
Photo from the site hardnsoft.ru
Equipment selection
Now let's talk about what equipment we need. To organize a Wi-Fi network, you need a so-called access point: it is responsible for sending data packets from one device to another. But it is only suitable for connecting several devices over the air, so we will use a Wi-Fi router that has such a point inside as the “heart” of our wireless network, as well as a built-in switch for wired devices. It is he who can provide not only the connection of “wired” devices (storage system or desktop computer) along with wireless ones, but also the connection of this entire equipment to the Internet. Without a switch, we would have to keep one of the computers constantly on.
Photo from the site hardnsoft.ru
So, conduct an audit of your computer hardware and choose a router that is suitable for the price with the required set of ports and wireless standard. For example, it can be a budget option with four hundred-megabyte Ethernet ports and an 802.11b/g access point, or a sophisticated one with eight Gigabit Ethernet ports, a dual-band 802.11n access point and three USB 2.0 ports, covering almost any need.
Particular consideration should be given to cases where the connection to the Internet is made not through a local Ethernet network, but via ADSL (an example is the well-known “Stream”), or in a more exotic way (WiMAX, GPRS or some other way). Then this should be taken into account when choosing a router. Stream will require a special router with a built-in ADSL modem, or, if you couldn’t find one or want to save a little money, you can use your existing ADSL modem, connecting the Internet through it, and all other nodes through an additional inexpensive router connected to the modem .
Photo from the site hardnsoft.ru
To work in WiMAX networks (Yota, Comstar and the like), there are special devices that include a WiMAX modem and a Wi-Fi access point. In this case, a router is either not needed at all, or can only be used to connect wired devices; you just need to pay attention to the fact that it can connect to the WAN via Wi-Fi (usually this is not possible using standard firmware). The same applies to a GPRS/EDGE connection (or a more modern version, the so-called 3G) - the easiest way is to purchase a communicator that can share an Internet access channel using the built-in Wi-Fi module.
It is still better to connect all devices with Ethernet ports with wires: files will be transferred more reliably and faster. The rest will use built-in Wi-Fi adapters or must be retrofitted with such adapters. For most laptops, it is easy to purchase and install a built-in PCI Mini / PCIe Mini card, or use an external USB adapter, which also fits some media players and NAS.
For a torrent network drive, an external USB drive or flash drive (64 GB models are already quite affordable) connected to the router (it must have a USB port) is suitable. A flash drive has the advantage that it does not require additional power, unlike the vast majority of USB hard drives (the built-in USB port in the router is very limited in terms of power provided), but it works slower. However, for most applications its speed is sufficient. You can organize a “rocking chair” in a media player or NAS, many of which support download mode, but this is less convenient, since it requires constantly turning on two devices instead of one.
Manual setting
To manually configure a network in each of the devices connected to it, you need to set three parameters - the IP addresses of the device and gateway, and the subnet mask. Everyone probably knows that an IP address is a unique number with which you can transfer data to any node on the network.
There are two versions of the address - v.4 and v.6, consisting of 4 and 6 bytes, respectively. The 6-byte version is not supported by all devices, but it will be the dominant one in the future. For now, the usual 4-byte one will suffice for us.
Photo from the site hardnsoft.ru
Since the IP address is unique, it does not have to be the same between devices on the same network. This is an immutable rule, violation of which is fraught with either a complete failure of the network or permanent problems. Therefore, you will have to use your imagination and come up with four numbers from 0 to 255 for each of the devices. To make this difficult task even easier, there are certain rules.
Data in computer networks is transmitted using so-called packets or sets of bytes, equipped with a header indicating the IP address or addresses of the destination nodes. Obviously, transmitting packets to all billions of computers on the Internet at once would make the work impossible, so the networks are divided into smaller subnets, and IP packets for local computers should not leave the subnet. To simplify the transmission of packets, all nodes on the same network are assigned similar IP addresses: 1, 2 or 3 bytes are the same, the rest are different. The subnet mask will help determine the number of matching bytes. Units are written in the place of matching bits, and zeros are written in place of different bits.
Thus, the class C network mask 255.255.255.0 means that only 1 byte, the last one, can change, that is, there cannot be more than 256 nodes in this network (in fact, only 255, since the address x.x.x.255 is reserved for broadcast packets, delivered immediately to all network nodes). It is unlikely that you will have more devices, so it is advisable not to fantasize and use this particular format. Addresses from 192.168.0.0 to 192.168.255.255 are reserved for addressing nodes in a type C network. Considering that they can also be used in the local network of your Internet provider, and also taking into account the restrictions on the use of broadcast packets, it is reasonable to choose addresses from 192.168.0.0 to 192.168.0.254 or from 192.168.N.0 to 192.168 for home network nodes .N.254, where N is any number from 1 to 254 (but must be the same for all network addresses!), if the first specified range coincides with the provider’s network range. Let's leave the subnet mask as standard: 255.255.255.0.
And the last thing is the gateway address. A gateway is a network node through which all other nodes connect to the Internet. So for us this will be the address of the router (usually 192.168.0.1) or the always-on computer that we decided to use as it. When setting up the router itself as a gateway, we specify it (if it is connected directly to the provider’s network) or the address of the ADSL modem (if it is connected via a modem).
Photo from the site hardnsoft.ru
The story about IP addressing will be incomplete if we do not mention one more, “special” address - 127.0.0.1. It is used to indicate the so-called local host, that is, the same computer from which the packet is sent. If you want to access files on the hard drive of the same computer you are currently working on through a browser, use the address 127.0.0.1, or localhost.
Photo from the site hardnsoft.ru
Automatic setup
Although it's easy to manually configure IP addresses, there are ways to automate this process. The main one is the DHCP server. As a rule, it is already built into most routers. It is enough to activate this option in the settings, and all network nodes that support the DHCP client function will be able to obtain an IP address themselves: you just need to tell them “Obtain an IP address automatically.”
Photo from the site hardnsoft.ru
This can be convenient in some cases: for example, when friends often come to you with their laptops and you don’t want to go into their settings every time. In addition, some devices, such as smartphones and media players, do not allow you to configure the IP address manually and only accept the automatic option.
Although manually entering addresses also has its advantages - the network configuration becomes more predictable, and some programs strive to remember the IP address of a network resource, so after changing it (which can happen at any time in automatic mode) they happily report that “the resource is unavailable "
Photo from the site hardnsoft.ru
Safety
Is it necessary? Many users do not pay due attention to security, which is partly facilitated by the policy of equipment manufacturers: in order to make the initial configuration of devices as easy as possible, all security systems are disabled by default. In wired networks this is acceptable, since to achieve absolute security it is enough to disconnect your home network from the Internet, and then a possible attacker will have the only way to penetrate your network - to get inside the apartment and connect to your router.
Even when connected to the Internet, your internal resources are not visible from the outside: to ensure their visibility, you need to configure the Port forwarding function in the router (as they say, “forward ports”). Then, when accessing a local resource from an external network, the router will redirect the packet to the local network node where the required resource is located (each type of resource has its own port number). Initially, Port forwarding is not configured at all, which allows you to be calm until you decide to become interested in this issue and configure the function yourself.
The situation is completely different with a wireless network. Since radio radiation spreads well even through walls, connecting to it is possible at some distance from your apartment. That is, an attacker living in a neighboring apartment or simply walking into the entrance (and sometimes sitting on a bench near the house) can easily connect to an unprotected (“open”) network. With the use of directional antennas this is possible even at a distance of several kilometers!
And don't say that you have nothing to hide. In the best case, attackers can simply steal your traffic (even if you have unlimited traffic, the speed will still drop), and in the worst case, they can commit some illegal action (say, steal passwords from a bank) by accessing the Internet through your network. And then the security service, having discovered the hack, will track the hacker's IP address, which will lead to - where do you think? - straight to you! And explaining that you have nothing to do with it will be quite problematic.
Therefore, using an open wireless network is not acceptable. There are three ways to protect data: authorization, encryption and packet filtering. Authorization is used to allow access to network resources only to those nodes that know the secret key. Encryption prevents possible interception of transmitted data by an attacker. Finally, packet filtering blocks network access to all but pre-defined users. You might think that authorization and filtering are similar; in fact, this is not so - node packets that have not passed filtering do not even reach the authorization stage.
But encryption and authorization are similar in that they are usually controlled by the same security standard. Modern routers and access points support the following standards: WEP (aka Shared Key), WPA-Personal (sometimes referred to as WPA-PSK), WPA-Enterprise, WPA2-Personal and WPA2-Enterprise. All but the last two are best not used due to insufficient security, and WEP encryption (sometimes controlled by separate settings) also leads to a noticeable drop in transmission speed.
However, there are no other options on the 802.11b network, and the few WPA implementations from different manufacturers are generally incompatible with each other. And if there are such devices in your network, the entire network will work in mode b, with all the ensuing consequences, including snail’s speed.
So it is highly advisable to get rid of legacy devices that do not support 802.11g. In laptops this is usually possible by replacing the built-in Wi-Fi card or using an external USB adapter, but in PDAs... Old PDAs will have to be replaced entirely or not used at all on the network.
Now let's talk about the difference between Personal and Enterprise encryption options. The first of them uses the generation of access keys based on a password, which, of course, should be chosen as long as possible, using letters of different case, numbers and special characters. If you fail to connect one or more devices, you should try entering the key in hexadecimal form, which is provided in almost all devices.
Of the two key encryption options - TKIP and AES - it is recommended to choose the second, more secure one. The combination TKIP+AES option that is sometimes encountered seems redundant and can lead to problems. Enterprise encryption is more secure, but requires a special RADIUS server. Therefore, if you do not have the time and/or desire to set up such a server, it is advisable to limit yourself to the “personal” option, especially since WPA2-Personal provides a quite sufficient level of security - in conversations about hacking wireless networks, WEP or, less often, WPA is usually mentioned and almost never WPA2. The decrease in network performance when using WPA2 encryption is almost invisible.
For those who want to take their security level to the paranoid level, we can recommend enabling filtering by MAC addresses. A MAC address is a unique device identifier, different for each wireless adapter, laptop or PDA. By adding the MAC addresses of your devices to the list, you can be sure that only they will be able to access the network, and activating the hidden network mode (turning off the Broadcast SSID) will not give an attacker even a reason to become interested in it. Additionally, you can activate the firewall (aka firewall) built into the router, leaving only the necessary ports open. In addition to protecting against port scanning, this is good against DoS (denial of service) attacks. You can also enable MAC filtering in the firewall, which will protect against unauthorized access through the wired network segment. Of course, this still won’t protect you from the attention of the mafia or intelligence services, but it will be several orders of magnitude more reliable than the lock on your front door.
Photo from the site hardnsoft.ru
The delights of high speeds
Appetite, as they say, comes with eating. It’s the same in building a network: having assembled and tested “at least some kind of network,” you immediately want “the same one, but faster.” Wide distribution of high-quality films of 30-40 GB each and other entertainment content requires impressive resources not only for storing it, but also for transmission. Therefore, if finances and the availability of available equipment allow, it makes sense to build a network immediately with a reserve for the future, that is, based on 802.11n.
True, expecting from this standard a threefold increase in speed compared to Fast Ethernet would, perhaps, be overly optimistic. As tests show (see the article “In the city of “n” in this issue of the magazine), the maximum that can be expected is to get very close to 100 Mb/s. Well, a fourfold increase in speed (compared to g) is also not bad. This will allow, for example, to transfer a gigabyte file in a couple of minutes or directly watch a Full HD movie from a network drive.
However, if you are just going to open the movie file with a player program, smooth viewing will only be possible if its size does not exceed one DVD disc. Due to possible dips in speed, which is almost inevitable with radio communications, jams may occur on larger files. If you want to watch movies this way, you will have to install a video streaming server, but this is a topic for a separate article.
To achieve even such relatively modest results in speed, you need to spend some time. First - on the selection of equipment. Since we nevertheless chose a router as the main element of the network (we will immediately discard the budget option - using a computer with a Wi-Fi card instead, since we decided to go for a walk), a lot depends on it.
The best choice would be to use a dual-band (2.4/5 GHz) device, since the 5-GHz band, due to its unoccupied nature, provides noticeably better connection stability (even if the average speed does not differ much from 2.4 GHz). This will allow applications that are critical to the quality of communication (such as video players) to be placed on the 5 GHz channel, and 2.4 GHz to be used to work with devices that are incompatible with the higher frequency channel.
If there are no strict requirements for connection stability, you can limit yourself to a single-band 2.4 GHz device (you should not purchase a single-band 5 GHz router - it is incompatible with most client adapters. However, I have never seen such ones). But you should pay attention to the company and model, otherwise there is a risk of disappointment. If you have a fast Internet channel connected via VPN or PPPoE, do not choose a model with a weak processor, as it may not keep up with the speed of the channel.
For laptops, it is preferable to use the built-in card. Of course, a USB adapter is convenient and versatile, but due to its limited size, most dongles have an ineffective antenna, which has a detrimental effect on the quality of communication. The antenna built into the lid of the laptop is unrivaled here. Unfortunately, due to problems with certification in Russia, it can be difficult to purchase a built-in card, but this can be done without any problems abroad - through online stores. A wide variety of such cards allows you to choose an option suitable for price and characteristics for almost any laptop, and sometimes even with free shipping.
As for 802.11g devices, they, of course, will work on the n network in compatibility mode, but if this is not necessary, it is better to disable this mode. Now we’ll tell you in more detail how to configure 802.11n for maximum performance.
802.11n - squeeze out the last one
How to ensure stable network operation at high speed? To better understand all the intricacies of the settings, we’ll tell you a little about what reserves were used to increase the speed in 802.11n.
First, the modulation type was changed from direct sequence spread spectrum (DSSS) to orthogonal frequency division multiplexing (OFDM), increasing the speed from 54 to 65 Mbps. The “green field” mode made it possible to reduce the size of the introductory packet and thereby reduce the overhead costs of service information. And finally, combining packages (Frame Bursting) made it possible to reduce the required amount. Thus, the speed has increased slightly to 72.2 Mb/s. “Where is the promised 300 Mb/s?” - you ask, and I will answer that the laws of physics are unshakable, and 72 Mb/s is all that can be obtained in one standard communication channel.
A further increase in speed was achieved only by the “brute force method” - the number of possible channels was increased to four (the so-called MIMO, or multi-beam transceiver mode), and the frequency band in each channel was doubled. All this added up to a maximum speed of almost 600 Mb/s. However, there are no devices on the market with such bandwidth yet, since the number of channels in real devices is limited to two. But this leaves the possibility of releasing them in the near future without any problems.
Now let's talk about how to use this magnificence. Often there are very few settings in the driver - only the channel number and frequency band. And it’s the second default parameter that is not configured in the best way: it is set to 20 MHz instead of 40, which gives only half the speed! Of course, this needs to be fixed. It is advisable to choose the channel number experimentally - for the best quality of communication and the absence of interference with other devices. You can use “Auto” - the router will try to select the least loaded channel, and all adapters will adapt to it.
All other options listed earlier must be enabled, otherwise the speed will drop. Unfortunately, the use of “green field” and Frame Bursting leads to packet collisions when there are devices on the network that do not support them (and these are all 802.11g devices). It is also advisable to activate the WMM (Wi-Fi multimedia) mode - this will ensure more stable operation of streaming applications, such as VoIP, through the use of the QoS (Quality of Service) service. Enabling WMM mode in the router may be required for the operation of some adapters, which otherwise will refuse to work at high speed. The WMM No-Acknowledgement checkbox in the settings can add a little more speed, but cause an increase in the number of errors in conditions of strong interference.
In order for all the features of the 802.11n network to function, clients exchange information with each other about what exactly each of them can do. The 802.11d protocol is responsible for this. Without it, the maximum speed will not be achieved, so it must be turned on. But it’s better not to use non-standard “improvers” like Afterburner: not only will they work only on those devices that are supported (and there are very few of them), but they will also only work in 802.11g mode, plus they impose a lot of other restrictions.
And finally - about the physical configuration of the network. “What could be the configuration? - you say. - Arranged the pieces of iron - and forward! But just this moment can significantly affect the quality of radio reception, and therefore the speed and stability of the channel. If in the case of a single antenna, radio waves propagate from it evenly in different directions, then in the case of two antennas (namely, two channels are used in modern n-standard routers), due to interference, the signal level can vary greatly. Try tilting or rotating one of them and see the results.
Setting the transmitter power to maximum (where it is possible to regulate it) is not the best solution. Of course, a more powerful signal is guaranteed to “reach” the farthest corners of your apartment, but it can drown out the response of the receiving device, and as a result, communication will be ineffective (the so-called near-field effect).
Attention should also be paid to the location of the devices. It is advisable to install the router higher, if possible at an equal distance from all reception points. This is especially critical in houses with reinforced concrete walls, since the internal reinforcement of such walls noticeably weakens the radio signal. In general, experiment and your efforts will be rewarded. At the planning stage, try to borrow equipment from friends for a while to figure out what and how. It is possible that you will need to audit other devices in your apartment: for example, a wireless mouse operating at a frequency of 47 MHz has a noticeably less impact on the operation of the Wi-Fi network than its sister based on Bluetooth technology.
Photo from the site hardnsoft.ru
Finally, we would like to thank the readers for the patience they needed to read the article to the end. As you can easily see, it contains the bare minimum of recommendations, and we tried to avoid specific examples. This was done deliberately, since specific implementations of certain parameters may vary from one manufacturer to another, but once you get the gist, it will not be difficult for you to determine which checkbox is responsible for the desired parameter. The most important idea that I would like to convey to the reader is that there is nothing complicated in creating wireless networks. Just do it and you will succeed!
500 - Internal Server Error
A local network (in our context, a home network) is a group of interconnected computers, laptops, printers, and televisions located within a house or room.
Advantages of using a local network:
- Access to general network services.
A) seamless exchange of file resources over the network (no need to transfer a file (photo, music, movie) from one computer to another using a USB drive; you can transfer it using a local home network).
B) Using a network printer. If you have a printer installed at home, using your home local network you can print from any computer/laptop to this printer.
C) Using a home network to build a gaming area. Many games support playing over a local network, and if you have one, you can play games with computers on your local network.
- All participants in the local network can access the Internet (if configured). If you use Wi-Fi to build a home local network, then tablets and phones can also be connected to the local network and access the Internet from them.
A local home network can be created in various ways, I will give diagrams of the most popular of them, starting with the most primitive and ending with more complex methods, with setting up the Internet on a local network.
Connecting two computers/laptops into a home local network using a network cable.
Let's look at the simplest way to connect two computers into a home network (computer - computer or computer - laptop). For this we need two computers/laptops and one network cable. Modern network cards are able to recognize what type of crimp your network cable has, so you can crimp it or buy a crimped cable Computer-Hub/Switch (direct crimp).
A schematic computer-to-computer connection looks like this:
The advantages of this method of creating a home network:
All you need to create a network is a cable and a clear head.
In this way, in most cases, you can only connect two computers/laptops, since most computers/laptops have one network card.
You must manually enter the IP address and mask on all computers/laptops on your home network.
Connecting several computers/laptops into a home local network using Wi-Fi.
For this method, you will need Wi-Fi on your computers/laptops.
Connection diagram:

The advantages of this method:
No wires
High workplace mobility
Connecting network devices into a home local network using a switch (switch).
For this method we need several computers/laptops, the same number of network cables and a switch (hub). The general connection diagram using a network switch looks like this: 
Those. We connect one of the devices (laptop, computer, printer or TV) to each switch port.
The advantages of this method:
- Ability to connect more than two computers/laptops to a local network (depending on the number of ports in the switch)
Minuses:
- You need to additionally buy a switch (switch), it costs about 500 rubles.
- You must manually enter the IP address and mask on all computers/laptops on the local network.
Connecting computers into a home local network using a router.
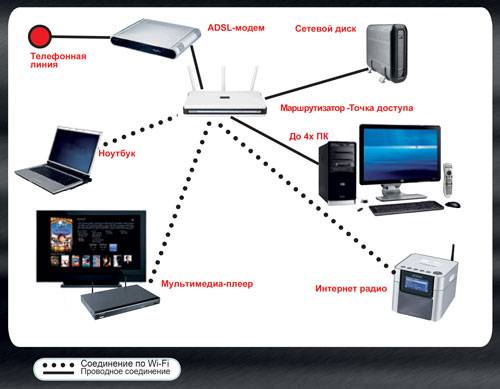
Using a router, you can set up a home local network with the Internet; if your router supports Wi-Fi wireless data transfer, then in addition to computers, laptops, printers, and televisions, you can add tablets and phones to the local network.
Scheme of a home local network using a Wi-Fi router/router: 
With this method of creating a local home network, you need to enable DHCP on the router - a service responsible for automatically distributing network settings (this function is enabled by default).
Pros of creating a home network using a router:
Helps to connect various devices (computer, laptop, printer, tablet, smartphone) into one local network.
Ability to set up Internet on your home network.
There is no need to manually configure network settings on each device.
The need to purchase a router (from 1000 rubles) and configure it.
