Dog house: building a warm kennel. Dog booth (53 photos): required materials and beautiful designs Types of booths
To make a doghouse, you must first decide on its dimensions. They are influenced by the size of the animal. Dogs can be one of three types. Therefore, booths are created:
- For small breeds such as dachshund, length 700 mm, width 550 mm and height 600 mm;
- For medium dogs similar to German Shepherd, 1200mm long, 750mm wide and 800mm high;
- For large animals, whose height at the withers is approximately the same as that of Caucasians, length 1400 mm, width 1000 mm and height 950 mm.
The dimensions of the dog house can be adjusted depending on the actual dimensions of the dog. So, his chest should freely pass into the hole of the structure. Therefore, it is necessary to add from 5 to 8 cm to its width. In this case, the best height of the hole is equal to a value that is 5 cm less than the height of the dog at the withers. At the same time, the maximum vertical size of the booth and its depth should be 5-8 cm greater than the height of the animal at the withers.

dog house sizes. Photo
The dimensions of the booth can change, but only upward. This rule is especially important to follow when the design is created for a puppy. When building a dog house with your own hands, you should always remember the following points:
- Nothing should disturb the dog in its home so that it can lie down or stand freely.
- Inlet must be convenient. To do this, it can even be slightly increased in size.
- A structure for a dog is necessary insulate so that the dog is warm in winter.
- The roof and walls of the structure must be securely protect animal from different precipitation and wind.
- The booth must be built from environmentally friendly material. It is best if it is made of wood, since wood is harmless to the dog’s health.
- The structure must be placed on the territory of the personal plot on a windless side. In this case, the dog must have maximum review.
- A good option for a booth is a design with a small attic, where you can store various things, including toys and dishes for the dog.
- It is recommended to perform the hole on a short wall. Thanks to this arrangement, it will be more convenient for the dog to climb into its home.
- Before creating a structure for a dog, you must carefully carry out calculation booth size. It is best to double check the dimensions several times. This will allow you to build the ideal structure for the animal.

DIY dog house - drawing
DIY dog house. Video instruction
A booth with a gable roof. Master Class


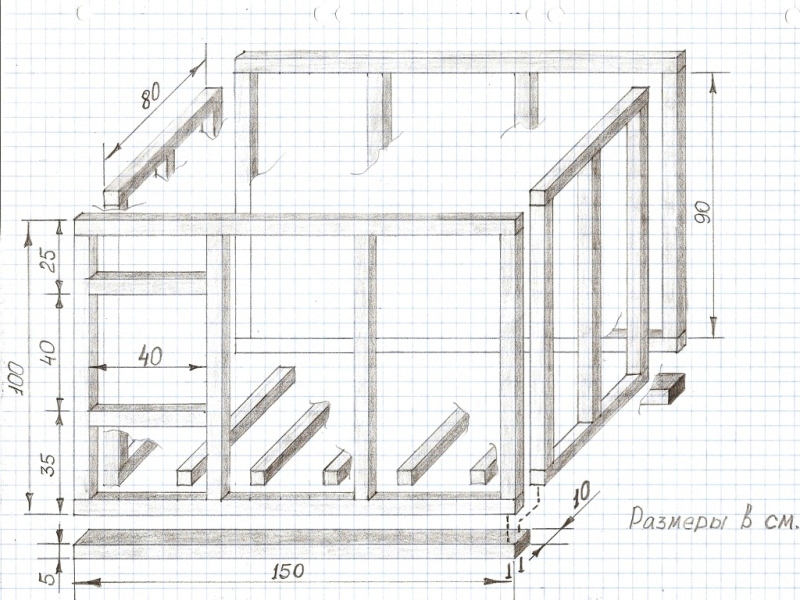
Drawing of a dog house
Step 1: Creating a Frame
The bottom frame is made of four bars, each side of which is 50 mm. The racks are fixed in its corners in a vertical position. Their size must correspond to the height of the booth. In the upper part they are tied using the same bars. The strength of the dog house frame is increased by attaching additional jumpers to the bottom and on both sides of the manhole.

how to make a dog house. Step by step photos


Step 2. Attaching the roof
Two structures are made, for each of which two bars measuring 50x50 mm are used. They are connected to each other so that an angle of 40 degrees is formed between them. The blanks are installed vertically on the frame flush with smaller walls and secured temporarily with nails. Two installed workpieces at the top points are connected to each other horizontally by a bar with the same cross-section. In this case, it must be ensured that it protrudes 200 mm in the front part of the kennel. Next, two bars of the same length are fixed at the lower points of the rafters.


Step 3: Lining the kennel
A wooden dog house is lined with clapboard on the outside. During work, you need to make sure that there are no gaps between the boards. Roofing felt is laid on the bottom and, if necessary, supports made from beams are secured.

Step 4. Insulation
First, the frame of the dog house is lined with glassine on the inside. It is fixed in the corners with a stapler. Then foam or mineral wool is fixed. Then the insulation is covered with glassine, on top of which plywood is fixed. It is also laid on the floor.

Step 5. Sheathing the roof
The temporarily fixed roof frame is removed, and its interior is sheathed with plywood. Then the structure turns over to its natural position. Next, glassine is fixed to the plywood, on which the insulation is laid. Then the thermal insulation material is covered again with glassine. At the end, the corrugated sheet is fixed. Self-tapping screws are used to secure it.

DIY shepherd doghouse. Step by step photos
If you make a dog house with your own hands with an opening roof, which has a slope only in one direction, then this design will make the process of cleaning and disinfecting the dog house easier. She will also allow the dog to sit on top of his home, since many dogs love to lie in such places.
It is important to provide insulation when creating a kennel. This will protect your dog from the cold. This is also facilitated by the location of the hole in a larger wall, but it must be shifted to one side. If this rule is followed during the construction of a house for a dog, then the animal will have a wonderful warm place. At the same time, it will be protected from the wind.
Step 1. Create a frame for the bottom
In accordance with the drawing of the dog house, bars are taken, each side of which is 40 mm. They are cut to fit the bottom. Then they are folded into a rectangle on a flat surface. Its corners are fixed using self-tapping screws. If the dog is large, then the frame needs to be strengthened. To do this, additional jumpers are fixed in it. Then, on one side, it is covered with boards.

DIY shepherd doghouse. Photos step by step


Step 2. Warming the bottom
The frame, covered on one side with boards, is turned over with the bars facing up. Its inner part is covered with glassine, which is fixed with staples from a stapler. Then the foam is laid between the beams. This material is cut according to the dimensions of the frame, and its thickness should be equal to the height of the beams. Then the insulation is covered with a layer of glassine and a finished floor is created.

Step 3. Making the frame
According to the drawing of the dog house, a beam with a size of 100 mm on each side is cut into 4 parts. Two of them must have a length equal to the height of the structure, and the other 2 frame parts must be 70-100 mm longer. All cut bars are mounted in the corners of the bottom strictly vertically. Longer posts are secured at the front using nails or screws, while others are secured at the back of the kennel. Thanks to this arrangement, the roof will have a slope. Also, when creating the frame, additional bars are used, which are fixed in the center of the walls in a vertical position. Two bars are also installed on the sides of the hole, but they are small in size. In order for the frame to have increased strength, it is necessary to use metal plates, with the help of which the internal joints are reinforced.

Step 4. Installation of wall sheathing
Lining is used for the outer cladding of the structure. Then they insulate the frame of the dog house from the inside. First, the glassine is fixed using staplers. Then foam or mineral wool is laid between the bars. Next, the insulating material is covered with glassine, which is covered with plywood. You can also use chipboard or any other similar material for this. Small zinc coated nails must be used to secure the sheathing. At the same time, their hats should always be recessed into the tree so that the dog cannot get hurt.

Shepherd doghouse. Photo master class


Step 5: Creating the Roof
A single-pitch roof is made using bars with a size of 40 mm on each side, and OSB sheet. First, the frame is created. Its dimensions correspond to the internal length and width of the booth. Then a part of the same size is cut out from the OSB sheet, which is fixed to the manufactured structure. Then the insulation is placed in the frame. It must be covered with film. The same stapler is used to fix it. At the next stage, another piece of plywood is cut out, the dimensions of which should be 100 mm larger than the frame of the dog house on three sides, and 150-200 mm on one side (the front part). This will protect the walls of the structure and the opening from various precipitation.
If you don’t have a sheet of OSB or plywood on hand, you can use boards whose thickness should be approximately 25 mm. The created structure, upholstered with soft tiles or roofing felt, is secured to the kennel using hinges.

Step 6. Finishing the booth
The finished dog house is processed from the outside antiseptic. Impregnation is also suitable for this. The applied products must dry completely. Then roofing material is fixed at the bottom of the structure. In this case, the insulating material should extend 50 mm onto the walls of the kennel. Next, two bars are fixed on the roofing felt, the size of which is 100x50 mm. They must also be treated with an antiseptic or impregnation. Then the house is turned over and its opening is decorated using wooden platbands.

Step 7: Installing a Shepherd Kennel
After completing the manufacture of the booth, a location for the structure is selected. It must be protected from the wind, level, dry and close to the house. It is best if the place is well lit and located near some kind of canopy or tree. The last feature of installing the booth will allow the dog to hide from the sun's rays if necessary.

Do-it-yourself ready-made shepherd doghouse. Photo

DIY booth with vestibule
To make the dog house more comfortable, you can build it with a vestibule. Such a dog’s home will consist of two sections:
- the far part, which is a sleeping place;
- the near part, allowing increased protection from cold and drafts.
The compartments are separated from each other using an insulated partition in which a manhole is located.
Making a doghouse is not that difficult, but when building it, it is not recommended to make a large sleeping place, since almost all dogs curl up while sleeping. In this case, it is necessary to provide the opportunity for the animal to stretch out freely in the vestibule when it rests in this place. Therefore, the dimensions of such part of the house must correspond ovate the dog's growth.

Dog house with vestibule. Dimensions and drawing
The assembly of the structure with the vestibule occurs in the same way as other booths. A distinctive feature of such a house is partition between two compartments of the dog’s home. It is created from bars with a cross-section of 40x40 mm, plywood, insulating material and self-tapping screws. First, a frame is made, the dimensions of which correspond to the width and height of the booth. Then, on one side, plywood is nailed to it. Then insulation is laid into it, on top of which another sheet of plywood is fixed.
In order for the partition to be easily removed, it is necessary to take two slats of wood and select longitudinal grooves in them using a cutter. Their width should be equal to the thickness of the partition. After this, the slats are fixed to the walls of the booth. After this, all that remains is to insert the partition into the created grooves.
Do-it-yourself timber kennel (for Alabai)
After calculating the size of the booth, the following drawing was obtained, which shows the approximate dimensions of the home for a large dog, for example, an alabai. In addition to the manhole, the design can include window for review. It must be located in the side wall.

Booth for Alabai - drawing with dimensions
Before starting construction of a timber kennel, it is best to complete the construction platform from logs. They need to be planed and hammered into a single structure, which then needs to be painted. After this, the construction of the kennel itself begins. The construction process will be completed quickly if the beams are prepared in advance. They need to be cut to size and planed on all sides.
According to the developed drawing, the first crown of the dog’s home is placed intact. Further, the side walls are also made from whole beams. Where there is a manhole and a window, pieces of material are used.


After the construction of the supporting structures of the booth is completed, the roof is constructed. It is best to make it a “house” so that a lot of snow does not accumulate on it, since the large area of the lean-to structure will contribute to this. In a home for a large dog, you need to provide a ceiling. It will make the kennel warmer. After its creation, the roof panels are assembled. In this case, the rafter system is not manufactured if the structure serves a decorative role. Roofing material is laid on the created panels. It can be soft or metal tiles. It is best to use the material that was used in the construction of a residential building or bathhouse. After this, the panels are connected to each other using nails or self-tapping screws and the gables of the structure are installed.


At the final stage, the manufactured roof is fixed to the walls of the kennel. At the same time, there is no need to insulate the frame of the dog house, since it is made of timber. This material itself is warm and has low thermal conductivity.

Dog kennel care
Now that it has become known how to make a booth with your own hands, it remains to find out how to care for it. First of all, you need to remember that cleaning the dog’s home should be done regularly. Usually it is carried out once a month. Wherein disinfection construction is carried out every month in the summer, and once a season in winter and spring.

By getting a dog, we not only acquire a four-legged faithful friend, but also become his caring owners. Indeed, in response to devotion, it is necessary to show your concern for him. For example, if a pet lives on the street, it needs a house where it can hide from bad weather and at night. By the way, you can make a dog house with your own hands, even without construction skills. What is needed for this and where to start, we will now figure it out.
DIY dog house - drawings and dimensions
At the first stage of working on a house for your four-legged friend, you need to decide on its size. You need to think carefully about them, since it depends on how comfortable your pet will feel in his house. It is a mistake to believe that only a small booth will become uncomfortable for the dog. If it is too big, she will also feel uncomfortable.
If the animal has already reached the peak of its growth, then it is necessary to measure its parameters and make a house based on them. For example, the depth of the booth should be 5 cm greater than the length of the pet from the tip of the nose to the tail. The width of the structure should reach approximately its height, to which 5 cm is added. The hole is made 5 cm wider than the girth of the dog’s chest, and its height is 5 cm more than its height at the withers. True, if you are just taking a puppy into your home, then you will have to rely on the average indicators that are indicated in reference books.
The house should be of such a size that the pet can turn around in it and lie down comfortably
By the way, the size of the booth affects not only convenience: it also determines whether the pet will freeze in the winter. Therefore, in the northern regions it is especially important to build a house that strictly meets the listed requirements. If you live closer to the south, then you can make it a little larger, exceeding the recommended figures by 5 cm.
There are also approximate dimensions that you can adhere to when making dog housing. For example, if you build a shepherd doghouse with your own hands, then it should be at least 95 cm high with a width and depth of 1.4 m and 1 m. The same applies to buildings for other large breeds. For an animal of average height, a house with a height of 80 cm, width and depth of 1.25 m and 0.75 m, respectively, is suitable. And for a small dog, a housing measuring 0.7 by 0.5 (width and depth) with a height of 0.6 cm is sufficient.

Calculations and drawings
Having made the necessary calculations, you can think about how to make a doghouse with your own hands and draw a corresponding sketch. After all, a building can look completely different, in accordance with your taste or in harmony with the surrounding landscape.


There are some recommendations that experts recommend following so that your pet’s home is not only pleasing to your eyes, but also comfortable. For example, the entrance should be located in the long part of the house, slightly shifting it in any direction relative to the center.

When making a home for a four-legged guard, you need to make sure that the sharp edges of nails do not stick out of the boards anywhere
If you do not have the skills to work with construction tools, then it will be easier for you to make a pitched roof. But the gable version still looks more beautiful. If you want to make some, you can make a roof with a small attic, and in it you will store dog toys, dishes, and food.
Finally, it’s quite easy to make a booth with your own hands with a canopy: it will look much more attractive. But this same detail performs a practical function, as it will allow the animal to look outside in the rain without the risk of getting wet. Having sketched a sketch of the structure, it is worth making a detailed drawing of it. With it there will be less chance of making a mistake, and it also simplifies the calculations of the required amount of materials.
Selecting material for the booth
Before making a doghouse, you need to prepare all the necessary materials and tools if our sketch and drawings are ready. Preference should be given to natural building materials. For example, coniferous wood will perform well, as it will be both relatively inexpensive and environmentally friendly.

You can make a house from real logs, especially if your site is designed in a rustic style
For example, you can take beams with a cross-section of 40x40 mm to make the frame of the structure. For the side walls, a regular board or sheets of plywood are suitable. You can use a floorboard on the floor. If you want to decorate the house, then you should also buy decorative slats. Additionally, you can use insulation if winters in your region are harsh. If you do not use moisture-resistant impregnations for the wood, then you need to take care of oilcloth or other materials with which you will need to upholster the house so that it does not rot prematurely.
As for the tools, their set is quite modest and can probably be found in almost every home. You will need a hammer, a hacksaw, nails, and a chisel for the job. This gentleman's kit is enough to make a booth with your own hands.
Making a doghouse with your own hands step by step
With ready-made drawings and materials, you can begin the construction process.


Video: DIY insulated dog house
Video: booth with a gable roof for alabai
Place for a ready-made dog home
For the convenience of your pet, it is important not only to know how to build a doghouse, but also to find a good place for it in the yard. If you have an enclosure, then you should place the house right inside it. But it must be taken into account that it should stand on a slight hill. Then the risk of home flooding during rain is eliminated.
Since you probably also keep a dog so that it guards your home, it is necessary to ensure that there is a good view of the main territory from its shelter.
After you make the dog house, take care of the little things. For example, it is worth sewing curtains from thick material, which will be useful both in summer and winter. In the summer heat, the house can be covered to keep it fresh, and in the winter cold they will not let snow and frosty winds in.
Now you know how to properly build a house for your four-legged pet. We wish you good luck and remember: we are responsible for those we have tamed.
So that the dog does not spoil the furniture and floors in the house and feels comfortable on the street, it is necessary to create normal conditions for his life in a country house. The main building at the dacha for this purpose will be a dog house. To choose it correctly, it is necessary to take into account the climatic conditions of the area.
Beautiful dog house
Dog houses can be made of different materials: wood, brick or metal. Making a booth from wood is very popular. This material is considered practical, environmentally friendly; construction can be done with your own hands in a short period. In addition, the wood is quite durable, and with its help it will be possible to create structures of any complexity.
 A castle for a dog that will fit perfectly into any landscape project of a suburban area
 Wooden booth
A simple wooden booth. The choice of location for the booth on the site will be based on the size of the site itself and the purpose of its location. Typically, such structures are located at the entrance to a suburban area; in extreme cases, they are located next to the entrance to the house.
 Typical design of a wooden dog house
 Before you start building a house for your pet, you will need to first draw up a design drawing. As a rule, it indicates all the dimensions of the booth and the amount of material used for this. The process of building a booth will not take much time. It does not require specific skills or experience in this area. In order for the dog to be comfortable in its new home, it is necessary to take into account its size when drawing up a sketch.
 Drawing of a simple wooden dog house
 Advice. If you have a large dog, then the booth should be at least 1.3-1.5 in height and approximately 2 m in width. If you need a booth for a small dog, then its dimensions can be 70x70 cm or 80x80 cm. Everyone chooses the best option for their dog.
How to correctly calculate the dimensions of a structure
In order to choose the normal size of the booth, you need to make certain calculations. The height of the walls of the future house is calculated by adding 15 cm to the height of the dog. If you plan to make certain floor insulation or simply put a rug inside the booth, then this is all taken into account, added up and added to the existing result.
As for the width of the house, it is calculated by measuring the length of the pet. It will be necessary to add up to 60 cm to this indicator so that the booth can be divided into a sleeping place and a kind of vestibule. The depth of the booth can correspond to its width. But it is taken into account that the size must be such that the dog can freely stretch out its paws in its home. Only then can a dog house be considered comfortable.
 An example of calculating the size of a dog house
 The process of building a wooden booth
As soon as the diagram of the booth and the material for it are ready, you can begin building the house.
Tools and materials that will be needed during construction:
- wooden panels,
- wooden beams,
- roofing material,
- hammer,
- screwdriver,
- saw or special electrical equipment of this type,
- nails,
- screws,
- level,
- ruler,
- pencil,
- insulation,
- sheets of plywood or thin OSB.
The first thing you need to do is cut the prepared material to the dimensions indicated in the plan. All finished elements are fastened together using self-tapping screws or ordinary construction nails.
 Required building materials and construction diagram of the booth with dimensions for a large shepherd dog
 Advice. To make the structure more durable, pre-prepared wooden blocks are laid and mounted at the junctions of structural elements, to which the parts must be attached.
A frame is first made from small wooden beams. All its elements must be set strictly to the level so that the structure has even proportions. This will also help in the future to give symmetry to the structure, and adjusting the dimensions of the material will be quite simple.
The wooden frame must be assembled using screws or nails. To give strength to the entire structure of this type, it is necessary to coat each joint with PVA glue, which perfectly secures the wood even without the use of special fasteners.
Read also
Clearing snow around the house
At the corners of the wooden frame it is necessary to use special metal corners. They give strength to the structure and further strengthen all the walls of the future house. You can find them in any furniture store or market.
After the frame is ready, you need to move on to its cladding. Wooden boards that have been previously prepared are mounted on the frame using nails and self-tapping screws.
 Wooden dog house frame
 In the first case, a hammer is used, and in the second, a screwdriver is used. The sides of such boards must be smooth to prevent cold air from penetrating through the cracks when joining.
Advice. In order to ensure the tightness of the structure, all connections will need to be sealed with a special sealant.
 Metal corners for rigidity and reliability of the structure
 To protect the wooden walls of the structure, it is necessary to cover them with layers of varnish or paint. This way the wood will be largely protected from the effects of weather and climatic conditions. Don't forget about insects that can feed on wood. It is best to treat it with an antiseptic.

The floor in the booth is made according to the principle of side walls. During construction work, special wooden legs are provided; they are strengthened into the ground and do not allow the wood to rot as a result of increased humidity under the house.
The inside walls and floor must be insulated and insulated. Especially in those regions that have a cold climate. This can be done using polystyrene foam, which does not absorb moisture and does not deform under the influence of temperature changes. Mineral wool can also be used, but it must be sufficiently protected from moisture, otherwise it will lose all its technical properties.

The insulation is attached after the frame has already been sheathed on all sides except the roof. The required dimensions are cut out of the insulating material to correspond to the cells of the frame. It is necessary to ensure that the insulation is tightly inserted into them. If this is not possible, then you can attach it to the wall using regular glue or double-sided tape. Sheets of plywood or thin OSB are attached on top of the insulation.
Advice. It is best to use plywood for construction, since it is considered to be better compressed than OSB sheets and will not swell too much when wet. The same cannot be said about OSB.
To make this material last longer, it is recommended to cover it with varnish or paint. Only then will it be possible to protect its structure from deformation. Sheets of such material are cut to the required dimensions. They should be similar to the dimensions of the walls and floor. They are fastened with nails or self-tapping screws, depending on convenience.
When building a dog house, it would be more efficient to use a screwdriver and self-tapping screws. They can significantly reduce the time for constructing such a structure.
When making a booth, do not forget about the entrance to the pet’s house. It should be quite spacious so that the dog can crawl into it freely and at the same time not too “open” so that water does not get in there during rain. For this purpose, special rubber doors are often used.
The dog can enter and exit the kennel without obstacles, and rainwater or cold air will not penetrate inside. Such doors can be removable for the summer period, or they can be stationary, but in the summer the dog will be uncomfortable in such a house.
 Wooden summer dog house
 The roof of a dog house can be made of any roofing material and have a variety of shapes. It is best to use a gable roof in the construction of a house. Rain and melt water will flow easily along it, which will enable the roofing material to last longer.
Some may think that using metal tiles for the roof of a pet’s kennel will be too expensive, but this material has excellent technical and operational characteristics.
For this reason, due to its low cost, most people prefer slate sheets. Over the course of many years, it has managed to establish itself as a strong, durable and warm roofing material. 
Every loving owner wants only the best for their pet. Along with issues of health, education and care, the thought arises of how to organize a cozy home kennel for your pet in a holiday apartment.
On the shelves of pet stores, various dog beds and even houses for dogs are striking. Not every loving owner can afford the prices for such devices. Don’t despair, you can organize a cozy place for your furry friend yourself.
Let's find out how to build a house for an apartment for dogs with your own hands?
Material
The variety of houses for four-legged friends on the Internet is fascinating. Colorful and vibrant creations inspire you to create a masterpiece. Don't be afraid to improvise and combine different house models.
Before work, clearly think about what materials should be used specifically for your dog. Consider the animal's personality traits.
Cardboard houses They look very impressive, are easy to invent and do not require special expenses. Such houses are suitable for dogs of small and medium breeds. The only drawback of such a shelter is its fragility. Don't rule out the possibility that your pet might want to chew on your efforts.

Foam rubber huts- a universal thing: such a house can be washed, folded and taken with you to nature / on a visit, so that your tailed friend feels more comfortable, and can be easily moved around the apartment. However, some owners note loss of shape after washing and the lack of a rigid frame as shortcomings of this product.

REFERENCE! Most dogs are diggers. When sewing a soft house, decorate the inside with durable fabrics.
Wooden booths the most durable and reliable structures that have served for hundreds of years to keep dogs comfortable. For an apartment this option is more than acceptable. The inconvenience of such “furniture” lies in its bulkiness and heaviness: it will be difficult to move around the living space.

The best option— try to combine different materials when working, complement the houses with pillows, beds with canopies, which will increase the level of comfort for your pet. It is not necessary to strictly adhere to the schemes. Try experimenting with the shapes of the house and upholstery yourself. To invent something unique, you don’t need to run to the store for materials. Take a closer look at old things: cabinets, cribs, old TVs. And such things can be breathed into new life, while providing a cozy nest for your dog.
Size
The first thing you should pay attention to is the breed of your dog.
ATTENTION! If you have a puppy in your home, make inquiries about the breed. What approximate parameters will a dog have at an older age?
The house should be of such a size that the dog can freely go inside, turn around, sit upright (without bending his head) and lie stretched out. The following parameters must be taken into account:
- Height at withers.
- Distance from the withers to the tip of the front paws.
- Width at chest.
- Length from nose to tail.
For an approximate calculation, refer to the approximate table for some dog breeds.

Metering
- an important part when creating a future house or lounger. By neglecting this procedure, you increase the chance of creating an uncomfortable product.
Based on the size of the breed, it is easier to determine what the future house will be like:
- From cardboard.
- Fabric (made of foam rubber).
- Made of wood or plywood.
By creating a “cozy nest” for your pet with your own hands, you get a huge scope for flight of imagination:
- You can design the model yourself.
- Use fabrics at your discretion (density, pattern, etc.).
- Add decor to your taste.
Remember, all diagrams are provided for illustrative purposes. The dimensions shown in the drawings may not be suitable for your pet.
For small breeds with your own hands
For small dogs of small breeds (Chihuahua, Dachshund, Maltese, Pomeranian and other breeds), you can use cardboard boxes, fabrics and foam rubber.
From cardboard or plywood
Original and exclusive
Houses using geodesic dome technology have become widely known on the Internet. Such houses are made of slats and fabric or cardboard. Such houses are used both for children and for pets, including dogs.
The advantage of such home kennels is that they are suitable for small dogs and are easy to make with your own hands. Plus, you can involve your child in doing them!
So, instructions on how to make a booth for an apartment out of cardboard with your own hands:

Step 1. Constructing patterns and cutting out parts. For this you will need:
- Cardboard.
- Scissors/construction (stationery) knife.
- Ruler.
- Pencil pen

Let us conventionally designate a triangle with red edges as “Triangle A” and with blue edges as “Triangle B”. You will also need squares for the bottom of your structure or rectangles. You can choose the sizes of the triangles yourself based on the proportions: use small triangles for a smoother dome shape and large ones for a rougher one; the side of a square or rectangle is slightly smaller than the height of the entrance.
From the edge of the triangles and squares, a 2-5 cm margin is counted, which will later serve as a place for fastening the parts.
Step 2. The triangles are fixed with hot glue or Moment glue along the released strips. You should start working from top to bottom. Form a pentagon from five triangles, then attach the remaining parts to each triangle using the diagram. For a beautiful entrance, you can remove one of the triangles of the last tier. The bottom is glued together from squares, leaving space for the entrance.

Step 3. Start decorating. The shelter can be painted using spray paint.

REFERENCE! This work can be supplemented with a wooden plywood floor, a personalized wooden sign above the entrance or any other decorative elements. The house is painted or covered, and a blanket or sleeping place is placed inside.
Cheap
There is also a simple way to make a dog house with your own hands. To do this, you will need a box of such size that your pet can comfortably turn around inside and sit upright.
How to make it out of the box:
We cut the top part of the box and glue it together as follows:
Use extra sheets of cardboard to create a roof. Cut out the doorway completely.
The final part is decoration (painting, possibly adding curtains for the entrance, etc.). We present to your attention one of the options for such a house:

The work is made of cardboard, covered on both sides with fabric and decorated with bows, ruffles and a decorative teddy bear. Making a booth out of cardboard is quite simple. This option is affordable and allows you to fully express yourself when creating.
Soft foam
The most beautiful and warm options for houses for small dogs are fabric dog beds made of foam rubber. Experienced needlewomen make patterns for houses of the most diverse and amazing shapes.

To create such a house you will need:
- Textile. The best choice would be linen, chintz, velor, fleece, faux fur jeans. When synthetic fabrics come into contact with fur, they will become electrified and give an electric shock to the dog. Your pet will not live in such a house.
- Foam rubber, synthetic winterizer, satin or down.
- Scissors.
- Sewing machine(you can do it manually, but the quality of work will be significantly lower).
How to make a house from foam rubber:

You can use another pattern. 
In the diagram, the unshaded parts indicate the primary building, from which the roof and bottom will be formed during the work.
How to sew:
According to the principle of a “house” pattern, the parts are cut out and sheathed on both sides with material. In the place where the roof and wall are sewn, the seams can be hidden under lace, ribbon or braid. The finished work looks like this.


Both options in one photo. The pink house is made according to the first scheme. The slight differences are the rounded front and rear walls, and the rounded roof due to a different sewing method.

Beds
Handicrafts also did not ignore the production of beds: they make beds from fabric, from tires, mixed compositions (fabric + wood). The most economical and easiest way to create a bed is to alter an old sweater or jacket: imagine, you don’t even need a pattern for a bed!

For work you will need:
- Sweater or textile jacket.
- Pencil/felt-tip pen.
- Filling, padding polyester or foam rubber.
- Scissors.
- Needle and thread/sewing machine.
Lay out the sweater on a work surface. The neckline is sewn up, a stitch is made from one sleeve to the other at the chest level of the jacket. Fill the future side with foam rubber through the sleeve and place one sleeve into the other.

The sleeves are then sewn together. At this stage, you can adjust the shape of the side: make it rectangular (stitch the corners) or round. The bottom is stuffed soft and also sewn; for a rounded shape, the bottom is folded and hemmed to the shape of the side. The final touch is to sew the sleeves to the base.
Lounger-pillow with ties
They look like designer ones and will be very suitable for decorative dogs:

Step 1. Constructing a pattern.
To do this, based on the parameters of the dog, draw a rectangle - the base. From the base, make allowances of 1-1.5 cm on all sides for lifting. From each edge, draw more rectangles of the desired height with allowances of 2.5-3 cm upwards. This way you will get a pattern that vaguely resembles a cross. Cut an opening from the side that will be the front.

Step 2. Cut out 2 pieces from the fabric according to the pattern.
Step 3. Sew the pieces along the top sides of the sides. Turn the product out through the side holes.
Step 4. Fill the lounger with padding polyester and carefully sew from one side through the center to the opposite. Thus, by sewing all the edges in the center you will get a pillow.

Step 5. Add ribbon or lace ties. Add decorative elements (buttons, bows, embroidery, etc.). You can complement the lounger with a canopy or pillows.

Pets for large and medium breeds
Made of wood
For dogs of large breeds, it is safer to create a large wooden house even for the apartment.

The first option is to create it from wood (bars). To do this you need:
- Wooden blocks or boards.
- Roulette.
- Jigsaw or saw.
- Nails/screws for fastening.
- Hammer/screwdriver.
- Paint for decoration.
- Grinder for grinding.
How to build:

A simplified option for creating a wooden house is to work with plywood. The principle of operation is similar to the first option, the only difference is in the sheathing (a sheet of plywood is nailed instead of boards). 
Photo
Examples of beautiful and original houses in the photo: recycling old furniture and household appliances into a bed, wicker beds, bed beds, bunk beds.  Feeder house
  Very stylish!
  Real retro: the smallest doghouse for an apartment
  Two-story cottage
  Wicker
  The perfect soft home for a little dog!
  Cool idea: a super lounger made from a wine barrel!
  Plastic egg house for small breeds such as Yorkies and Spitz

 Mink
Mink  Hut for doggies: a real wigwam!
Rollers
Useful videos “We sew a shelter for dogs with our own hands”:
- From the box
- Soft
- Bed
Conclusion
Arranging a sleeping area for your shaggy friend is a pleasant process for both of you. By showing yourself, you show how important your pet is. Any house: cardboard, soft or wooden will provide your four-legged friend with a comfort zone. Even the simplest sweater bed can make your little one happy.
To make your creation last a long time and be as comfortable as possible, use the following tips:
- Don't neglect measurements. Knowing the dimensions of your animal, you create a comfortable and fairly spacious home
- Be sure to work through the drawings. The chance of getting confused at work is reduced to a minimum.
- Choose materials based on the size of the dog, its character and temperament. When choosing materials for soft products, think about what fabrics to use: consider the degree of shaggyness of the dog (a pet with long hair will be hot in a house made of warm and fluffy fabrics, wool tends to get clogged in fleecy fabric , which complicates cleaning the house).
- Soft houses are designed for dogs weighing no more than 20 kg.
- For fabric houses it is better to use foam rubber or padding polyester, for beds - padding polyester or filler.
- Wooden booths must be sanded to protect the animal from splinters.
We hope that the information provided above was useful to you. Share your handicraft experience and photo reports in the comments. Tell us whether your faithful assistant participated in the creation of the house, and whether he was happy at the end of the work. We look forward to your stories, photos and advice from experienced craftsmen.
Before getting a dog, the owner should decide where the dog will live. In the city, most pets live in apartments, and in country houses, the animal (especially if the breed is medium or large in size) is given a corner in the yard, where they place a ready-made booth or build it from scrap materials.
The construction of a booth does not require special skills and takes no more than one day if you have the materials and know some of the features.

Design and dimensions
To build a kennel, you need to know its future dimensions, the material for the kennel itself and insulation, the location and size of the entrance.

First of all, you should decide on the dimensions of the dog’s home. They depend on the size of your dog. The height of the kennel to the ceiling is equal to the height of an adult dog, to which 10 cm is added. The width is determined by measuring the width of the dog’s chest and adding 10 cm to it, the depth by adding 10-20 cm to the length of the body without the tail.

In general, the kennel should be spacious enough for the dog to turn around and stretch out its paws, but not too bulky, otherwise it will be difficult for the dog to heat it.
If you are making a kennel for a small puppy, then you have to use reference materials. For different breeds, there are tables of recommended kennel dimensions (width/length/height):
- For large breeds (great Danes, mastiffs) – 120*100*100 cm
- For medium breeds (huskies, setters, labradors) – 100*80*100 cm.
- For small breeds (dachshunds) – 80*60*80 cm.

Please note that the dimensions shown here are from the inside; if you plan to make interior lining, then add the wall thickness to all measurements.

As for the device, they use two options: one room, or divide it into a “vestibule” and the main one. But dogs love to watch what is happening around them, and the vestibule only gets in the way.

The booth is placed on a plank platform raised above the ground. Part of the flooring can extend beyond the booth, forming a bed over which it is good to make a canopy - dogs love to spend time outside.

To make it convenient to disinfect and clean, small booths have a removable roof or a folding one. Over time, organic particles and fur accumulate in the kennel and fleas often appear, so regular cleaning is necessary.

Many dogs like to lie on the roof, so it is better to make it lean, with a slight slope back to drain water.

A gable roof only increases the internal volume of the booth, which makes heating difficult, without bringing any benefit to the animal.

If you still want to make the roof a “house,” then first you should build a flat ceiling so that the dog does not freeze. The roof can be covered with bitumen shingles, roofing felt, or metal tiles.

Material for the booth itself and insulation
The booth can be built from almost any available material; traditionally wood or particle boards are used. The best craftsmanship is coniferous wood; it retains heat better in the cold season.
Brick and concrete get very hot in hot weather and cool quickly in cold weather; plywood and plastic are short-lived.

Usually a frame is built from timber, which is then sheathed with the selected material. The main condition when building a roof and walls is that there are no gaps; drafts are dangerous for dogs. The floor, walls and ceiling must be smooth, without protruding knots, screws or nails.
Note!


Any booth should be insulated. The following materials are suitable as insulation:
- Felt
- Foam rubber
- Expanded clay
- Penoplex (foam plastic)
- Mineral wool

In the latter case, steam and waterproofing are laid to completely eliminate the possibility of fiber particles getting into the kennel - they cause allergies in dogs. Any insulation should not protrude over the inner lining.

In cold weather, they put straw on the floor (precisely straw, since hay generates dust, and sawdust cakes and quickly becomes damp), the dog itself will make a “nest” in it, and throw away the excess.

During the winter, the litter should be replaced two or three times; in warm weather, it should be removed.
Laz
This also has its own characteristics. The height of the opening is determined by adding 5 cm to the height of the animal, the width depends on the width of the dog’s chest - measure it and also add 5-6 cm. Make it wider - it will be cold, narrower - it’s uncomfortable for the dog to climb.

Note!

The opening is not cut in the center of the wall, but is shifted to one of the corners. Your dog will be able to hide from precipitation and wind behind the wall. For a small puppy, a small opening is made, which is expanded as it grows.

The entrance to the kennel is hung with two sheets of coarse fabric, cut into wide strips. The fabric is secured in the opening, moving the slits, so the dog can enter freely, and the wind will not blow inside.

A threshold 10-15 cm high is nailed to the bottom of the opening to prevent snow from getting inside and to prevent the dog from throwing out the bedding.

The booth is located on an elevated place, well protected from the sun and wind, but giving a good view of the area from the entrance.

Insulated kennel option
In this case, a doghouse was built from improvised materials, with a small canopy on the side and two blank walls.

Note!

Two wide wooden shields were made to size on four timber supports. Floor boards were laid on this platform. Legs are necessary to protect the floor from moisture.

The bars were attached to the corners of the structure. There were six pieces in total: four bars for the booth itself and two for the outer windproof walls.

Then they built the inner lining, attached 7 cm of Penoplex to it and covered the outside with boards. To prevent water from flowing between the skins, a block was nailed on top.

Whole boards were used for the external cladding of the wall adjacent to the wind barrier wall. So the whole structure becomes more rigid.

The construction of the roof took the longest time. They didn’t want to make it completely flat, so first they built an insulated shield, to which they nailed a rounded cover made of stacked slats.

The roof is not sloped, but due to its shape, water will still drain. To protect against moisture, a film was placed under the boards.

Diagram of a kennel for a large breed of dog (Caucasian)
The version of the booth shown in the photo below was built for a medium-sized dog, but according to the drawings of a booth intended for a Caucasian.

They were going to place the kennel near the bathhouse and wanted to make it match the style. For the booth, the remaining materials from the construction of the bathhouse itself were used.

Adjustments were made to the original design: a door was made at the back for cleaning, and a window was cut into the side wall for viewing.

First, they built and painted a wooden platform from logs that had previously been planed and nailed together. Then we started assembling the booth itself. The structure was completely assembled in the workshop and then taken out and installed in the desired place near the bathhouse.

The lower crown was laid intact - it supports the structure and forms a threshold. Then the timber was cut according to the planned pattern.

Since the owners planned to build the roof in the shape of a “house”, like on a bathhouse, they built a flat ceiling from a thick sheet of plywood. He was laid on a dowel cut into the timber. Then the shields were installed and secured on top.

They were assembled without rafter mesh, since the roof was decorative. They simply nailed the panels together, covered them with soft tiles left over from the bathhouse, and covered the gables with boards.

The booth is ready. Construction and installation took half a day.

Photo booth for a dog with your own hands


