How to transfer applications from internal. How to transfer applications from internal memory to SD card in Android
Modern Android devices support expanding the internal memory with cards of a very decent size. This is useful for many reasons. For example, in the event of a factory reset or other failure, you will not lose important applications and personal information. Among other things, on weak smartphones and tablets, this allows you to slightly speed up the device, leaving it with additional space to create a swap file.
Built-in way to transfer an application to an SD card in Android
For many applications, there is a native method of transferring to a card. To determine whether you can move the program to another drive, go to “Settings” -> “Applications” and see if the button labeled “Move to SD” is active. If yes, feel free to click and wait for the system to handle the task on its own. If the button is not active, the developers may have blocked this function (working from the built-in disk is faster by default). In this case, go to section 2 and use third-party software.
Programs for transferring to SD card in Android
There are a huge variety of paid and free programs that can help us with the assigned task. However, the most popular of them is AppMgr III, also known as App 2 SD. In addition to its main function (transferring programs to the card), it also clears the cache and shows summary information on files, their distribution into groups, free space on the device, and so on. Managing the program is extremely simple: all the contents of the phone/tablet are divided into 3 sections – “On the phone”, “On the map”, “Only on the phone”. Consequently, the “On the map” applications can be moved to the “On the phone” section, and the third group, alas, cannot be transferred at all. It’s very convenient that App 2 SD supports the ability to bulk select and transfer, so you don’t have to waste extra time dragging programs one by one.
Transfer cache to SD card in Android
An interesting detail regarding the optimization of Android devices is that the cache can take up more space than the application files themselves. Therefore, a separate transfer of the cache to an SD card may be useful. For this purpose, you will need another program called FolderMount, as well as being previously rooted. If your device meets these requirements, use the program as follows:
- launch FolderMount and click “+” in the upper right corner of the screen;
- in the “Name” line, enter the name of the application whose cache we want to move;
- in the “Source” line, respectively, write the address of the folder with the cache, for example *SD/Android/obb/program folder*;
- in the “Destination” line, select the final location;
- Click the checkbox at the top and the pin icon opposite the name from the first item in the list;
- When the transfer is complete, the “pin” will turn green.


If you are planning to transfer programs to an external card because the device has become slow, do not rush to complicate yourself with this process. It may be worth using special programs to clean up disk space, after which the device will regain its full functionality.
Owners of mobile gadgets with insufficient internal memory are forced to move them to an SD card when installing utilities. For beginners, this procedure can cause some difficulties. Therefore, we will further describe how to transfer an application to an external storage device in the standard way, as well as which programs from Google Play can simplify and automate this procedure.
Android has standard tools to transfer installed utilities to an external drive. True, this is only available for those applications in which the described feature was provided by the developers. Moreover, only individual files are moved, and a certain amount of data still remains in the memory of the Android gadget. We will describe below how to transfer applications to a memory card:
If the corresponding element is not active, then this action is not provided for this program. Please also note that on some Chinese devices, in this way, files are transferred not to an external drive, but to the other half of the internal memory intended for multimedia.
Using the AppMgr III utility
You can transfer applications to an SD card using AppMgr III as described below:

Next, a standard manager window will open, where in the usual way, after tapping on the “Move to SD card” button, the corresponding action will be performed. Thus, AppMgr III acts only as an intermediary between the user and the system, facilitating the search for utilities that can migrate to an external drive.
AppMgr III also has another useful function. The fact is that some applications lose some of their functionality after sending files to an external card:
- Widgets may stop working;
- Utilities that schedule certain actions after a system reboot do not receive notification from the system that the download is complete, which is why further work may be incorrect;
- Accounts created by the program stop working until the files are moved back to the internal memory.
Such utilities can be moved to an external drive, but their icon will show a crossed out card.

When performing this action, AppMgr III will first display a window that describes the functionality that is lost after migrating files.
In addition to the described functions, it is possible to hide unnecessary standard applications installed by the manufacturer, clear the cache, delete and move selected utilities in batch mode. It is important that if the described function is not provided by the device manufacturer, then AppMgr III will not be able to transfer any application to the memory card, since it uses standard methods for this.
Working with FolderMount on rooted devices
If you own a rooted device, it will be useful to take advantage of the features provided by FolderMount. With its help, you can significantly relieve internal memory by rewriting the entire cache to external media. Consequently, the program works with all games that clog up the gadget’s internal memory the most.
Let's describe how to transfer applications to an Android memory card:

Note that the functionality of the applications does not change, and the large cache can be rewritten not only to SD, but also to any other external drive, including a flash drive and even HDD.
Moving a program to an external drive using Link2SD
Here you will also need root rights. Additionally, you will have to work with the flash drive, namely create a second primary partition for it. The first one must be formatted in FAT32, the second in ext2, ext3 or ext4. If you mix up the sequence, the computer will no longer be able to detect the flash drive.
Each transferred file will be stored in the second partition, and the first, as usual, will be reserved by the system for user data. You can create an additional partition on the drive through a computer, using, for example, MiniTool Partition Wizard, Paragon and other tools for partitioning disks. Upon completion of preparation:


The amount of built-in memory is something that many smartphone manufacturers save on. This is especially true for budget devices based on the Android operating system. Such budget models may have 8, 4 or 2 gigabytes of memory. You also need to take into account that part of this memory will be occupied by files of the operating system itself. As a result, users end up with a device with very little free space to install applications.
But, there is a solution to this problem. If you have an Android operating system version 2.2 or higher, then you can use the application transfer feature. This will free up some space and allow you to install new applications. If you are interested, then you have come to the right place. In this article we will talk about how to transfer applications to a memory card on Android.
Step #1: Open Settings and go to Applications.
First of all, you need to open the Android settings and go to the “Application Manager” section. In some firmware, this settings section may simply be called “Applications”.
Step #2: Open the desired application.
After going to the “Application Manager” section, you will see a list of all installed applications. Here you need to find the application that you want to transfer to the memory card and open it.

Step No. 3. Transfer the application to the memory card.
After selecting an application from the list, you should see a page with information about this application. Here you can see how much memory this application takes up, as well as get other information.
In order to transfer the application to a memory card, you need to click on the “To SD memory card” button. In other firmware, this button may be called “Move to SD card” or something else. But the meaning is the same - transfer of the application.
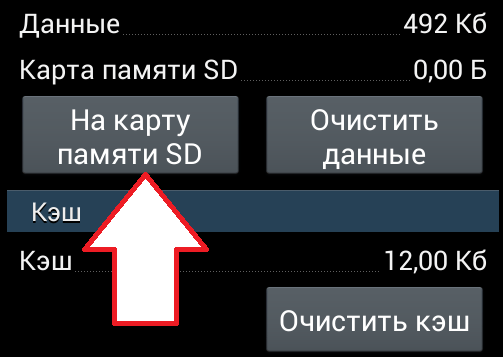
Note! In some cases, the app transfer button is missing. This means that this application cannot be transferred. Select another application from the list.
Step #4: Wait until the application transfer is completed.
After clicking on the application transfer button, the operating system will begin to copy data from the device’s built-in memory to the memory card. During this time, the transfer button will be unavailable.

After a while, the “Move to device memory” message will appear on the transfer button. This means that the application transfer is complete and you can use it.
Mass transfer of applications on Android.
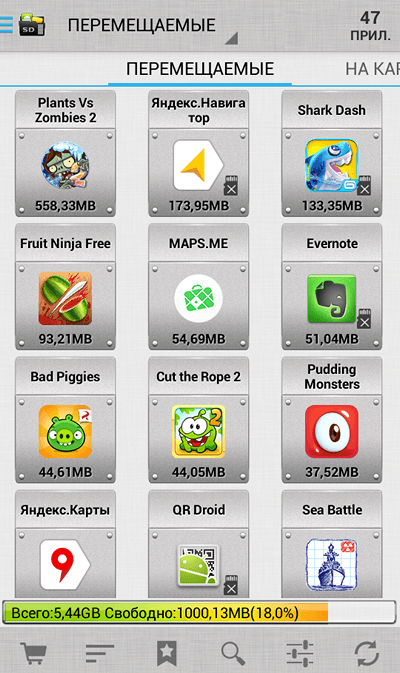
This application sorts all adopted applications into three categories:
- Movable (applications that can be moved to a memory card and back);
- On the SD card (applications that were previously transferred to the memory card);
- In the phone (applications that are located in the phone’s built-in memory);
This sorting of installed applications allows you to quickly figure out which applications can be transferred and which cannot. You can also quickly go from the program to the application page in the Application Manager and actually transfer the application, as described above.
Many owners of modern gadgets are trying their best to expand the memory in their device. Unfortunately, 4-8 GB of internal memory is not enough for users to work comfortably. An SD card allows you to expand these boundaries. You can transfer music, videos or text documents to it. But what can you do with games? How to move applications to a memory card? Now there are many ways to help you do this.
Standard means
As we have already found out, built-in memory plays an important role in using the device. As a rule, about 1 gigabyte is allocated for the operating system, 2 GB for multimedia files. So what remains? Only 1 gigabyte is allocated for various applications. Of course, by modern standards this is very little. Nowadays there are Android applications that take up more than 2 GB. It doesn’t matter how powerful your mobile phone is, because without memory you won’t be able to install normal applications. It is because of this that many users are looking for a way out of this situation. Let's look at how, using standard tools, you can move applications to a memory card from Samsung, Asus and other well-known brands. Unfortunately, this method will not work for owners of Chinese phones.

The fact is that in Chinese models, developers separate internal memory for general use and memory for multimedia. When transferring, the files will simply move to the second half.
On more expensive models, developers have provided the ability to transfer applications to an external drive. This method does not require any third-party utilities. If your phone supports this feature, then you can easily move the necessary programs. How to move applications to an Android memory card?
First, let's go to the settings of your device.
Go to the “Applications” item.
In the list, find the application that needs to be moved and click on it.
In the new window, click on the “Move to USB drive” button.

Unfortunately, not all programs can be moved. If the developers have provided such an opportunity, then you will move the application in a few minutes. You also need to remember that not all files are moved to the SD card. Only large files are transferred, while others that are responsible for launching the application remain on the internal memory.
Additional software
How to move an application to a Lenovo memory card? This can be done automatically using additional programs. The most common is App Mgr III. This utility is available to everyone. It's free and you can download it from Google Play. The program is quite simple, anyone can understand the functionality. When installing a new program, it will warn you that you can install the game on the SD card. Agree with it and wait for the game to install.
Using the App Mgr III program
How can I move applications to a memory card using additional software? If the game or program is already installed on the device, then you should follow the instructions to transfer the utility.

1. Open the required application and select “Moveable” from the top. This will show you all the games that can be moved to the SD card. You can also view games and programs that have already been moved by selecting “On SD card”, and utilities that cannot be transferred.
3. Confirm the selected actions and wait for the set goal to be achieved.
Using FolderMount
FolderMount is a special program that performs its functions perfectly. It will help you move the application. Using this program, the Android memory card will be used as the main memory, since it allows you to move almost all files to an external drive. Unfortunately, FolderMount has a significant drawback: it requires ROOT rights. If you get superuser rights, then this utility will help you a lot. It transfers not only game files, but also their cache. It's great for gaming. You can also transfer applications not only to an SD card, but also to any other external storage device.

FolderMount operation
Transferring files using this utility is quite simple, but some users may encounter certain problems. How to move applications to a memory card?
Download the program from Google Play and install it.
Click on the button in the form of a plus sign, which is located in the upper right corner.
In the new window, first select “Name” and write the name of the game you want to move.
After this, select “Destination” where you want to move the game.
Confirm the action by clicking on the checkmark in the upper right corner. We wait for the application to move to the memory card. Then you can move on to other games.
Conclusion
How to move applications to a memory card? As you may have noticed, there is nothing complicated about this. If using standard tools you were unable to move the game or program, then you should install additional software. Of course, these programs will not be able to transfer all applications to the SD card, but this way you will still free up memory. The most effective utility is FolderMount, but it requires ROOT rights. When you get superuser rights, you take a risk, but it greatly expands the functionality of the phone as a whole and gives you many new features.
The current variety of games and applications that can be found on Google Play sometimes it’s just amazing. It happens that you find a great application, start downloading it and realize that the system memory is enough for a maximum of 2-3 of them applications. In addition, most applications, when installed, do not have the ability to subsequently transfer them to an SD card.
For example, the Samsung Galaxy Y S5360 device has only 190 MB of system memory, of which 110 is occupied by the Android platform itself and a number of system applications. Based on this, you have no more than 70 - 80 MB at your disposal, which forces you to constantly sacrifice one application in favor of another or, in general, does not allow you to download it.
After reading this article, you will get a solution to your memory problem, as you will learn how to transfer any applications (even system ones) to an external card.
Preliminary information
Before moving on to instructions, please read the text below carefully.
You can move some applications to a flash drive right now. To do this, go to settings, click on “Applications” and then “Manage applications” and after finding the software that you want to move to the flash drive, open it. If it is possible to transfer it to an SD card, the “To SD memory card” button will be active. As you will see in the picture below, the application that I selected does not have the ability to be transferred to a flash drive.

Using this application as an example, we will demonstrate how you can move transfer-protected software.
Next stage. To use the method that we will talk about next, you will need root rights. You can find out how to get them by clicking on the link - click.
The instructions themselves
In order for this method to be implemented, we will need to download the free application, which is located on PlayMarket, follow this link - click or go to playmarket from your gadget and enter in the application search: Link2SD.
- Download and install the software on your gadget
When you find the required application in the market, click download and wait until the download is completed. Then, wait a little longer while the application is installed. Due to the fact that the download occurs from the market, there will be no failures, and the application itself will not infect your phone with viruses.
It is worth noting that it works on devices with systems 2.0 and higher. Install and launch the Link2SD application.

- We find the application we want to transfer
At the beginning of the article, the MarketHelper application was demonstrated, which did not want to be transferred to a flash drive. Now I will find it on my gadget using the Link2SD application and demonstrate with its example how the transfer is carried out.
1) Find the application:

2) Click on its name

3) What do we see?
We see a short description of the file, which describes its name, size and location. And two buttons - “Move to SD card” and “Actions”.
With the first button, I think that everything is clear and we will talk about it a little further. As for the “Actions” button, a list of several options opens here:

You can launch, reinstall, or do other actions shown in the picture above.
4) Transfer the application to an external memory card
In order for the transfer to occur, press the “Transfer to SD card” button, then “OK”.

This is where we need super user rights. We provide them to the application by clicking “Allow” and wait for the software to be transferred to the flash drive. If the software transfer is successful, you will receive the following message:

As you can see from the picture below, the application is now located on the flash card:

WARNING
With this application you can transfer any software to a flash card, this makes your flash drive an integral part of the device, because it will now be used as the gadget’s system memory. Therefore, the transfer of any system application is carried out at your own peril and risk, because flash drives tend to fail!
When you connect the device to a computer, your gadget will not detect flash drives (this is the norm), therefore, all system applications located on the flash card will disappear while using USB.
And lastly, not all applications are suitable for transferring to a flash drive. This rule is absolute for software that contains widgets. When you transfer an application that has widgets to a flash drive, it will work, but using widgets becomes impossible.
