Let's find out how to increase WiFi coverage area. How to boost Wifi signal on laptop
The question is of course fair and the answer will also be unexpected - two routers are not needed for most users.
However, if you look at a situation like this, the picture of utility changes.
For example, in a large apartment you want to avoid numerous wires. Or you have a lot (two, three) TVs and you don’t want to get an Internet cable for everyone.
Then you will see that the standard Wi-Fi range is not enough.
What then?
Then combining two routers via Wi-Fi
In this option we don't need any cables, so I think it's more attractive.
And the result will be wonderful. Because we still have a single network, but with the addition of one more access point.
And the main thing is that Wi-Fi coverage area increases without loss of quality.
The only requirement for such a connection is that the second router acts as a repeater for the main signal. If I’m not mistaken in the names, this function is called repeater mode, and today most routers have WDS technology.
Settings for a bunch of routers.
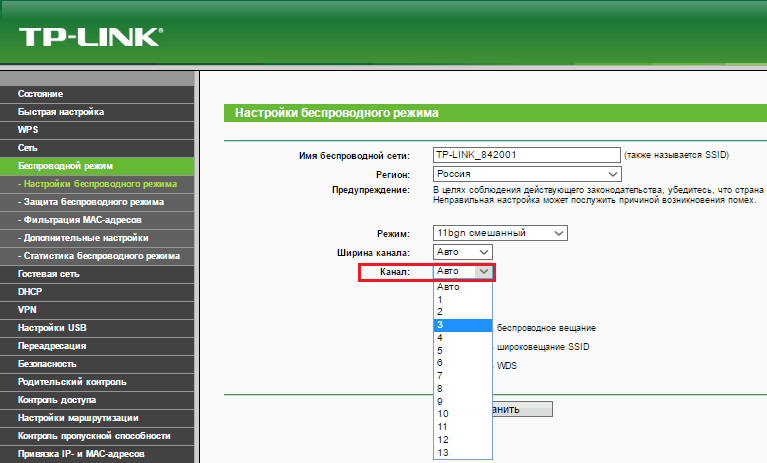
We do not change anything in the main router, all parameters remain the same. You need to check the channel number in the Wireless section (Chanel line).
We check the same thing in the second router, otherwise they will not start working together. Now the main task is to configure the second device to signal relay mode. Make sure the second router supports WDS technology.
This can be checked in the documents or on the manufacturer's website. Then connect it to your computer and go to settings through your browser.
Here we make the following changes:
In the WPS section, disable the active status and reboot the router.
It is recommended to go to the DHCP section and disable the server of the same name, since the function of the repeater is to receive network data and not distribute it.
Select the Network section and change the last number in the IP address (you can increase it by one) so that it does not coincide with the combination specified in the operating data of the main router. After the reboot, enter a new set of numbers to enter the parameters.
Open Wireless:
1. Change the Network Name - come up with a name for the access point so that you know which device you are connecting to.
2. Go to Chanel and select the same number as in the basic Internet settings.
3. Check the box next to Enable WDS Bridging - this will enable the operating mode as a repeater.
4. Now that work has begun in the new mode, new settings will appear - click on Survey to search for the network to which we will connect.
5. From the search results, select the main access point, click Connect. In the window that appears, all that remains is to set the encryption type (Key Type) and enter a password for logging into the Internet.
After installing a second access point, you will significantly increase your Wi-Fi coverage area without losing speed and connection quality.
And this is what we need!
So beat it, in one touch about the cable connection.
There are two types of connection using a LAN cable - LAN-WAN or LAN-LAN
Here, equipment for accessing the Internet is located in one network segment. To establish a LAN-to-LAN connection in the main device, all data remains as default.
And in the LAN-WAN process, one of the routers becomes the main one and it receives the Internet. And the second router plays the role of a secondary network and receives data from the “main” access point.
There are relatively many settings:
Enter your IP address in your browser and you will see your device settings.
In the LAN section there should be a checkmark next to the DHCP server.
In the WAN section, the connection type is set to Dynamic IP. And so on…
That’s why I don’t consider it any more than we settled on a Wi-Fi connection. So two routers are not an unnecessary luxury!
Tiny bonus in the topic:
Did you know that the modem mode in modern phones allows you to “distribute” the Internet connection to other mobile devices using both a wireless connection and a USB connection. No, .
Good luck, Friends!
Living in a spacious apartment is undoubtedly good, but the problem is that the larger the room, the more difficult it is to ensure that the Wi-Fi signal covers it entirely. The main “evil” here is concrete walls. It is they, the insidious interior partitions, that prevent you from freely using the Internet.
Do you want to solve the problem radically? Set aside the sledgehammer and hammer drill. Today we’ll talk about how to boost your router’s signal using twelve proven methods without destroying your home.
The first group of methods: fast, simple, without risk
Updating the router firmware
A low Wi-Fi signal level may be a firmware bug. To solve the problem, it is often enough to install a more recent version by downloading it from the manufacturer’s website.Select a free channel
In apartment buildings and large office centers, the wireless link your network uses may be overloaded. This is indicated by dips and frequent dropouts of the Wi-Fi signal, as well as repeated failures when trying to connect to your own access point.Changing the channel in the router settings will help solve the problem.
You can choose the most free one either experimentally or using a free application inSSIder, which shows all Wi-Fi users in the computer’s visibility range and what channels they are on.

Optimal placement of the router in the apartment
The question of where it is best to place the router cannot be answered unambiguously. The layout of the rooms, and the appliances themselves, are different for everyone. The optimal location is considered to be the center of the apartment, but not always and not for everyone, so it will be better if you experiment a little.You definitely shouldn’t place the router close to heat sources. The reason for the deterioration of the performance of some models, especially those prone to overheating, is an excessively hot “climate”.
Household appliances (electric stoves, microwave ovens, radiotelephones, “frost-free” refrigerators) and power cables (even those laid inside the walls) can extinguish the Wi-Fi signal, so try to make sure that there is There was nothing like that in the apartment (a place where the signal does not penetrate). It is also advisable to remove mirrors, aquariums and other objects with reflective surfaces from there.
Blocking access to the network to arrogant neighbors
Too simple - a temptation for not too honest people to use your network. If some cunning “hacker” has connected to your access point and is playing online games (watching movies, downloading torrents, sitting in video chats), problems with Internet speed are guaranteed.To check if this is the case, look in the router settings. The presence of uninvited guests on the list is a reason to immediately change the password to a more complex one and prohibit unauthorized connections by filtering MAC addresses.

If a “particularly advanced hacker” is interested in your network, then bypassing a tricky password is not a problem for him, nor is masking the MAC addresses of his devices. In this case, it is best to create a filtering rule that allows only your PCs and gadgets to connect to the access point and denies everyone else.
Some routers have one unpleasant property: the longer they work, the more the Wi-Fi signal level decreases. After a reboot, the signal is restored, lasts 1-2 days and drops again.
If the device is in an accessible place, simply reboot it as often as necessary. For those who do not have such an opportunity (or desire), methods have been invented to automatically reboot routers on a schedule. Scripts designed for this are often posted on forums dedicated to networks and network devices. However, they are not created by device manufacturers, but by third-party developers, so I cannot guarantee their functionality.
There are also hardware solutions to this problem. For example, adapters for sockets with a timer (they turn off the power to the connected device at a specified time) or IP sockets (“pingers”) that monitor the availability of network devices and, if any of them do not respond, restart the access point. The price of such devices is approximately $5 to $50.
Transition to 5 GHz frequency and 802.11n/ac standard
If your access point operates in two bands (2.4 GHz and 5 GHz), switch to the 5 GHz frequency. Few people use it yet, so it is practically free.
Also, if possible, disconnect from the network devices that operate according to 802.11a/b/g standards - their low transmission and reception speed slows down the entire network.
Increasing transmitter power
Most modern routers support changing the transmitter power. On some, it is set to medium by default. Switching to high often solves the problem of short radio range.
Second group of methods: with moderate costs and effort
Replacing access point antennas with more powerful ones
If your router is equipped with removable antennas (or non-removable ones, but you are “friendly” with a soldering iron, and the device is not under warranty), you can replace them with longer-range ones. The antenna gain of the majority of home routers is 2-5 dBi. Instead, you can set it to 7-10 dBi.Making a homemade amplifier
A tin can, some wire, foil and the ability to work with your hands is almost all you need to create a homemade Wi-Fi amplifier. I don’t know for sure how much such devices amplify the signal, but many craftsmen claim that it’s not bad. If you don’t mind that the device will not look very aesthetically pleasing, why not try to make it? Manufacturing instructions are easy to find on the Internet.Third group of methods: with significant costs or risk
Installing alternative DD-WRT firmware
The DD-WRT firmware can significantly expand the capabilities of a home router, including increasing the transmitter power to the permissible maximum and strengthening the Wi-Fi signal. DD-WRT supports, but its authors do not guarantee that the device will remain operational after installation. If you bet, do so only at your own peril and risk. And with loss of warranty.Buying a Wi-Fi signal repeater

A repeater is a distance of several tens or hundreds of meters, receiving a signal from the access point. The solution is convenient and simple, but not at all budget-friendly. The cost of such a device is approximately 2/3 the price of an average router, and sometimes more.
By the way, you can use another router as a repeater if you have one.
Buying a more modern and powerful router
This method is the most effective, but also the most expensive. Choose a new router from 802.11ac class models with dual-band support - they are by far the fastest and will be relevant for at least the next 5-7 years.I hope at least one of the 12 methods will be useful to you. Happy experimenting!
Also on the site:
“A step beyond the possible”: how to strengthen the signal of a Wi-Fi router updated: January 11, 2017 by: Johnny Mnemonic
Problems with WiFi signal stability and poor wireless network reception in most cases can be solved at home. The first step is to choose the optimal router location. Then you should check its parameters and set the values at which the connection speed will be maximum. If this does not help, it is advisable to use an external antenna or repeater.
Move the router to the center of the apartment
Regular home routers are equipped with omnidirectional antennas. Radio waves travel in all directions, and if the router location is poorly chosen, most of the signal can go to neighbors. To avoid this situation, install the device in a central part of the room in which it will be used. This will help strengthen the signal in distant rooms.
In the vertical plane, the router should be placed as high as possible. When choosing an access point location, mentally draw lines between it and the places where the wireless network will be used. There should be as few obstacles as possible in the path of signal propagation: thick walls and partitions, large household appliances, pieces of furniture.
Due to their physical properties, radio waves are able to bend around obstacles, reflecting from walls and interior items. But not all materials reflect WiFi equally. For example, aquariums and indoor plants absorb most of the wave energy. Therefore, if there are such objects between the router and the end device, changing the installation location will help strengthen the signal.
Change your router settings
The main parameters, changing which can strengthen the signal, include:
- Transmitter power;
- WiFi channel;
- Operating mode according to the 802.11 standard.
All these properties can be changed through the router's web interface. The information required to enter this interface is usually indicated by the manufacturer on a sticker on the underside of the device. If it is not there, check the delivery package. It may contain a separate insert with login information: IP address of the admin panel, standard login and password.
Increasing router power
Go to the menu section responsible for setting up the WiFi network. Find "Transmit Power", "Tx Power" or "Transmit Power". The value of this parameter on most routers can be selected from a drop-down list. When used in large rooms with many obstacles, it is recommended to increase the power to 100%.

Important! On TP-Link equipment, instead of power as a percentage, a relative value is indicated: “High” or “High”.
Selecting the optimal wireless network channel
The most common frequency range on which WiFi operates is 2.4 GHz. It is divided into 13 partially overlapping bands of 20 or 40 MHz width. When several routers operate on the same frequency, signal overlap occurs, which reduces the quality of communication and the speed of data transfer.
To strengthen the reception level, select the least loaded channel in the access point parameters. You can find out which channels your neighbors' routers operate on using the free inSSIDer utility. You can also activate automatic channel selection in the router settings.

Changing the operating mode
The 802.11 wireless standard has several wireless network operating modes. The most common of them:
- 802.11b/g/n;
- 802.11g/n;
- 802.11n.
The first two modes provide backward compatibility with legacy equipment that does not have the ability to work with the 802.11n standard. Their main disadvantage is the reduction in data exchange speed with modern devices that support “N” mode. To improve the performance of your home network, enable data transfer according to the 802.11n standard. After this, reboot the router and make sure that all network devices have successfully connected to WiFi.

Advice! Do not select “802.11n” if not all home equipment supports this wireless mode. Otherwise, such devices will not be able to connect to the WiFi network.
Install an external antenna or powerful adapter
Antennas on most routers are connected via an RP-SMA connector. Standard signal amplifiers, as a rule, can be removed and then replaced with antennas with a higher gain. When choosing such equipment, consider the type of connector, power and directionality. You can check equipment compatibility on the manufacturer's website.

But even connecting a powerful antenna will not help ensure a high signal level on devices with a low-power receiver. Data from the router will be freely transferred to a laptop or other device. However, the built-in radio module may not be able to cope with sending a return signal if there are many obstacles on the way to the router. In this case, it is advisable to strengthen the transmitter by connecting an external WiFi adapter with an antenna.
I decided to prepare an article with tips on strengthening the signal of a Wi-Fi network. On the Internet, there are many different articles on this topic, but in almost every article there is a lot of unnecessary information. More precisely, a lot of recommendations for some settings that have nothing to do with increasing the range of the Wi-Fi signal and cannot in any way affect the range of the network itself.
If we are talking about strengthening the Wi-Fi signal, then of course we will introduce the coverage radius of the network itself, that is, the Wi-Fi range. For example: we bought a router, installed it, configured it, but in the farthest rooms there is no Wi-Fi at all, or the signal level is too weak. Or, the router is installed on the ground floor (where there is a signal), and on the second floor the signal is already very weak or absent altogether. A common situation that many people face, and I’ve encountered this myself.
What determines the range of a Wi-Fi network? There are a lot of different factors: from the router itself (number and strength of antennas), from the walls in your house, from the number of neighboring Wi-Fi networks, from the location of the router, some other interference, etc. Many people ask you to recommend a router that, for example, will provide a stable Wi-Fi signal for a three-room apartment, a private house, and etc. In such cases, it is impossible to advise anything specific. Everyone has different conditions, different walls, etc. The only thing I can advise is to roughly focus on the area of your home. If, for example, you have a one-room apartment, then even an inexpensive router with one antenna with a power of 3 dBi will cope with its task without any problems. Well, if you have a larger house or apartment, then take a more expensive device. Although, price is not always an argument. I have an expensive one, three antennas, some kind of proprietary Asus function that increases the network coverage radius. So, under the same conditions, at the same distance, it does not show much better results than the same one. Which has internal antennas, and is several times cheaper.
How to strengthen the Wi-Fi signal in the router settings?
If you have already purchased and installed a router at home or in the office, and Wi-Fi is not available everywhere you need it, then you can try to strengthen the wireless network. We will now look at how to do this. You can strengthen the signal both using the settings in the router and using separate devices and devices.
1 Search and change the channel on the router. If your devices see many of your neighbors’ networks available for connection, then all these networks can load the channel on which your network operates, and thereby reduce the network’s range.
You can try setting some kind of static channel in the router settings, or setting it to Auto. This is where you need to experiment. If you are not too lazy, then using the inSSIDer program you can find a freer channel and set it in the settings of your router.
I won’t go into detail, I’ll just give you a link to the article. In it, I talked in detail about channels, and how to find an unloaded channel. Also, there are instructions for changing the channel on routers from different manufacturers.
2 We switch our network to 802.11N operating mode. As a rule, by default on all routers the wireless network operates in mixed mode b/g/n (11bgn mixed). If you force the router to broadcast Wi-Fi in 802.11N operating mode, this can increase not only the speed, but also the Wi-Fi coverage range (if your router has more than one antenna).
The only problem is that if you have older devices that don't support 802.11N mode, they simply won't see your network. If you don't have any older devices, then don't hesitate to switch your network to n mode. It's very easy to do. We go into the router settings, usually at the address 192.168.1.1, or 192.168.0.1 (see detailed instructions on entering the settings).
In settings, open the tab where you configure the wireless network. They are usually called like this: Wi-Fi, Wireless mode, Wireless network, Wireless, etc. Find the item there Wireless mode(Mode) and set it to N only. That is, the network operates only in N mode.
For example: changing the wireless network mode on an Asus router

Save the settings and reboot the router. If you have problems connecting devices, return the mixed mode back.
3 We check the transmission power in the router settings. On some routers, it is possible to set the power level of the wireless Wi-Fi network. As far as I know, the default is maximum power. But, you can check.
In Asus routers, these settings can be changed on the tab Wireless network - Professionally. At the very bottom, there is a point " Tx power control". There is a scale that can be adjusted in percentages. It looks like this:

On Tp-Link routers, open the tab Wireless - Wireless Advanced. Paragraph Transmit Power allows you to adjust the signal strength. The High value means maximum power.

These settings will be more useful if you want, on the contrary, to reduce the signal strength of your Wi-Fi router.
How to increase the range of a Wi-Fi network using additional devices?
1 Installing a repeater, or setting up a second router in amplifier mode. Of all the recommendations that you will see here, or generally find on the Internet, this method is the most effective and reliable. True, you will have to spend money on a repeater.
Ordinary routers can act as a repeater. Here are the instructions for setting up ZyXEL and Asus routers in repeater mode:
If your Wi-Fi does not reach some rooms, then installing a repeater will solve this problem. And if you have a house with several floors, then you can install a router on the first floor, and a repeater on the second. Excellent and working scheme.
2 Changing the router antennas to more powerful ones. If your router has removable antennas, you can buy more powerful ones, and thereby slightly increase the coverage of your network. Why a little? Yes, because replacing antennas usually does not give a very good result. It is there, but not enough to increase the radius by several rooms. In any case, you will have to spend money on antennas. And it seems to me that this money would be much better spent on a repeater. Yes, it will cost more, but the benefits from it are much greater.
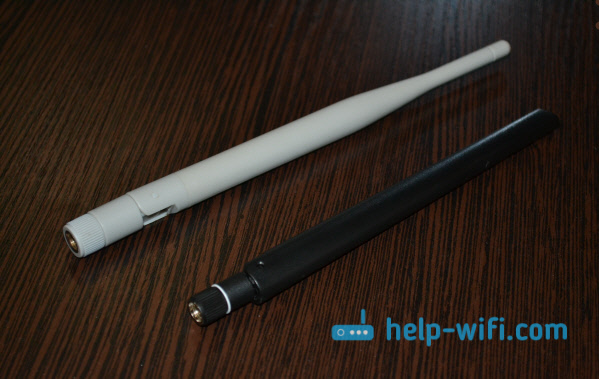
If you decide to change antennas, then take powerful ones with a gain of 8 dBi. But they are expensive, and several of these antennas will cost as much as a repeater.
I already wrote, you can see the results.
3 Buying a new router, switching to 5 GHz. You can buy a more powerful, expensive router. Better yet, a router that supports the 5 GHz band. What is the advantage of the 5 GHz range? It is practically free, now most all networks and other devices operate in the 2.4 GHz range. Less interference means more speed and greater network range.
There are places where a 2.4 GHz Wi-Fi network practically does not work. It glitches all the time, connection drops, low speed, etc. And all because there are so many different networks. In such cases, switching to 5 GHz solves all problems.
1 Select the correct location for your router. This is actually very good and effective advice. As a rule, everyone installs routers at the entrance, or in some distant rooms. The correct location of the router will allow the signal to be distributed correctly, thereby increasing the Wi-Fi range.
Simply put, you need to install the router as close to the center of the house as possible. Yes, this does not always work out, since you need to lay a cable to the router, and pulling it to the middle of the house is not very convenient. But even minor movements of the router can increase the network level in the rooms you need. Also, you need to remember that walls are the enemy of Wi-Fi networks.
2 Homemade amplifiers for Wi-Fi antennas. You can find many instructions that show how to make amplifiers for a router. As a rule, this is ordinary foil and tin cans. It turns out that if we place a sheet of foil on one side of the antenna, the signal will bounce off it and be directed in the direction we need.

I think this is all nonsense. Firstly, a cut beer can or a piece of foil on the back of the router doesn’t look very nice, and secondly, it has practically no effect. You can check.
These are the tips. I think you have found a suitable way for yourself to increase the range of your Wi-Fi network. Share your tips in the comments!
Hi all! In this article I will tell you how to strengthen the signal of a wifi router in your home or office.
WI-FI is very popular today in terms of demand in the field of computer technology. There are a lot of problems around WI-FI. If the speed of the Internet connected via a wireless connection is very low, then in my article you will find 10 tips that will help you strengthen the signal of the router, and thereby increase the speed of the Internet.
Why is the wifi signal very weak?
If your internet speed improves when you reboot your router, then you can use this tip. When conducting an in-depth study, you can find out what the problem is; most often it is due to overheating of the hardware or old firmware. But you shouldn’t get hung up on this, you can just do it about once a day (or more often).
You can reboot using DD-WRT firmware or a timer. If you configure the router to automatically reboot, you won’t have to do it manually every time.
We increase the wifi signal using DD-WRT firmware
The DD-WRT firmware significantly improves the router's Wi-Fi signal. With this firmware, you will not only get additional functions, but also improve the stability of the router.
Of course, this can damage the equipment, but more routers can easily handle a power increase of up to 70 mW. Do not forget that radio radiation is dangerous for the body, and therefore you should not leave the router running at high power too often.
Restrict others' Internet connection
If someone on your home network often video chats, downloads movies and music, or plays online games, then this, of course, significantly affects the Internet speed of other home network users.
If this is your case, then increasing the signal strength will be useless; in your case, you should configure the “Quality of Service or QoS. With its help, priorities will be set to direct speed to more important programs that you need to work.
Setting a good wifi password from neighbors
If a password is set on your router, this does not mean that it is. It's not that difficult to do this. There are methods that will help you detect all users who are connected to your Wi-Fi. But this won’t do much, it’s better to completely deprive your freebie-loving neighbors from using your Wi-Fi.
How to strengthen a wifi router signal by extending the antenna
Install the router in the center of the room!
It often happens that the router does not fit into the design of the apartment, but you should not hide it too far, for example, in a closet. To strengthen the signal of the router, you should place it in an open and free place.
It is better to install the antenna in a vertical position. The higher the router is installed, the better it will be. In order for the signal to cover the entire apartment, it is advisable to install the router in its center.
Buying a modern router (expensive)
This method is not only the simplest, but also the most reliable. The point of this method is to use the most modern equipment.
That is, buy a router with the longest signal transmission range. It will be expensive, but you will forget about how to strengthen the router’s wifi signal.
Installing a wifi repeater (repeater)
If all the tips I listed below did not help you, then you need to install a WiFi signal repeater in your house. It won't cost you a lot of money, and if you still have an old router at home, you can use it, which will allow you to increase your wireless coverage area.
It is necessary to flash the old router using the DD-WRT firmware mentioned above. There is a possibility that the speed will not be as high as the speed of the main router, but this is much better than not having it and it is completely possible to connect to wireless Internet in the far corners of the apartment.
Having done everything that I advised you in this article, you will learn how to strengthen the wifi router signal and the speed, reliability and security of your wireless Internet. Recently I told a very interesting point, you can read it very interesting, and you can also read about it. That's all for me, I wish everyone great health!
With UV. Evgeny Kryzhanovsky
