How to breed worms for fishing at home: suitable types and care for them
Most of the verifarm's products are bought by fishermen, so it is important to know which species are in greatest demand among them. Those. what are the best worms for fishing? To do this, you need to have at least a little idea about the main species and how to breed worms for fishing at home.
Let's start with the fact that fishing is a rather serious activity. Many experienced fishermen make good money by selling their catch on the market. The basis of good fishing is, of course, bait and the main one is worms, the choice of which fishermen take very seriously.
Fishermen are willing to pay well for good worms, which means that there is an opportunity for those who breed them to make money. Fishermen themselves can also breed worms; there is a reason for this, because... You can choose the type of worms yourself and select those that are suitable for fishing.
Worm differs from worm
Anglers who have devoted many years to their hobby are well aware that not every worm is suitable for good fishing. In particular, a good bite depends on the correct selection of bait, and as a result, true masters of this business (not those who prefer to simply sit with a fishing rod and drink a couple of glasses of something stronger) take this issue extremely seriously. In our country, only a few types of worms are suitable for fishing. We will not dwell on the scientific names of these species; we do not need to. We will briefly describe their habitat and how well fish bite on them and what kind of fish they are.
Crawls
Crawlers or earthworms are called worms, which are large in size. They were called that because when there is a good rain, they crawl to the surface from their holes. At this time they are usually collected. When compared with other species, crawlers can be called real giants. The length of individual individuals can be 30 cm or more, and the thickness can be up to 1 cm. This species is well suited for catching any fish. They are extremely susceptible to any vibrations; if you stomp loudly, they begin to hide in their burrows, from which it is extremely difficult to extract them.
Dung
It is not difficult to guess that this species is found in manure. The color of the dung worm body is dark red. It cannot boast of large sizes. They live in colonies, which greatly facilitates the process of collecting them. They should not be allowed to be in the open sun. It is valued by fishermen for its activity and mobility on the hook, as this behavior attracts the attention of fish.
Subleaf
The habitat of these worms is rotten foliage. They can also be found under stones, boards, or branches that have been in one place for a long time. The color of the body is red-violet. Attracts fish well. The disadvantages include the fact that its body does not have sufficient elasticity and is easily torn on the hook.
Does not have good activity on the hook. But it is good for catching crucian carp and crucian carp.

California red
This species certainly deserves the attention of anglers. Very similar to dung. It was bred artificially. Well suited for catching almost all types of fish. For breeding you need to choose quiet and warm places. The soil needs to be watered every day.
Video “In detail about the business of worms”
This video shows how to breed worms at home and make good money at the same time.
Breeding worms at home
It is very convenient to always have the right amount of worm on hand. By growing worms at home, there is no need for difficult and time-consuming searches, saving money on their purchase and transportation. Feeding and care costs are minimal. Let us describe step by step the process of breeding worms for fishing at home.
Container for breeding
Breeding worms at home is not difficult and a regular box made of wood or plastic will do for starters; we recommend the following dimensions: 60x40x30cm, they are enough. It is necessary to drill about thirty holes with a diameter of about 1 cm in the bottom for drainage.

The box must be placed on a tray with sand to absorb excess moisture that may leak from the box.

It is good to equip the structure with wheels, this is convenient in case it needs to be moved.
Priming
We lay out the bottom with hay or straw in a layer of about five centimeters (in a compressed state), the use of large shavings is acceptable. Next, pour vermicompost (approximately a ten-centimeter layer), which you can either buy in a store, but it’s better and more economical to get it from summer residents or farmers.

Feeding
You can feed the worms with various organic matter. A variety of kitchen peelings, except potato peelings. Fruits that are in compote, tea leaves, coffee grounds, porridge (non-dairy only). To make the worms eat the food better, you can grind it in a food processor or simply pass it through a meat grinder. From time to time it is necessary to add well-crushed chicken egg shells. The food is laid out in a layer of about six centimeters. Approximately a two-centimeter layer of vermicompost is sprinkled on top. New food should be added when the old one is eaten. It's easy to install. The surface is leveled and any bumps disappear. If anyone doesn’t know yet, vermicompost is small particles with virtually no odors. The color is dark brown, almost black.
Watering
You need to spill it using a watering can. Don't worry about the water stagnating, as the excess will drain out through the holes in the bottom. To check the humidity, you need to take a little substrate in your hand and squeeze it; moisture should come out. If a lot of water comes out, this means that you have over-moistened the soil. Before watering, the water should sit for three days (three days will be enough) and be at room temperature. Water when the soil begins to dry out and when fertilizing. The box must be covered with a lid or corrugated cardboard.

Temperature
The most suitable temperature for breeding worms is between 18 - 24C. Worm boxes should be kept in a dark place.
Settlement
In about a couple of months, the number of worms will increase several times. By this time, you should have new moving boxes prepared. Remove the top soil, divide it into equal parts and place it in prepared new boxes.
Storage
When purchasing worms, you need to know how to store them correctly. The container containing the worms should not be stored in the open. The storage area should be dark and cool. The optimal temperature is from three to thirty degrees. The storage period should not exceed a month. At least once every seven days, feed the worms by spreading a little porridge (but not milk), cottage cheese or boiled potatoes on the top layer. Likewise, it is necessary to control the humidity of the substrate. Water (every two to three days).

- You cannot mix whole worms with their halves.
- The storage container must be large enough. There's no point in being greedy.
- Worms are well preserved in wooden containers (boxes, drawers). At the same time, be sure to make holes in them for ventilation. The box needs to be turned over periodically.
- You can store the worm the old fashioned way - in canvas bags. It is very comfortable. They are easy to moisturize and turn over. And when you are fishing you can put it in your pocket.
- Worms are very poorly preserved in a metal jar, and if they are exposed to the open sun and wind, in such conditions they can simply die. In addition, they can become saturated with the smell of metal, which will repel fish. Worms are best preserved in a wooden box and covered with a piece of white, damp cloth.
- You should also not store worms in glass jars. Not only are they poorly preserved, but the jar can also break.
- Nettle leaves are a good way to store worms.
- Before fishing, sort out the worms. Remove the dead ones and then transfer them to damp sandy soil, to which you add some moss and wood chips. And before you go fishing, add a couple of drops of unrefined sunflower oil to the worms.
These tips are simple, but will help to significantly increase your catch and preserve worms for a longer time. Good luck!
Preparation of feed for worms. This is the best option to grow worms and reproduce them successfully.
The worm is certainly one of the best, and most importantly, universal baits. You can successfully catch almost any fish with it throughout the entire period of open water; It works well in winter, especially when catching large bream, for which a bunch of worms is a favorite delicacy.
Read the article and go to the discussion forum,


The bait is good for everyone, except for one thing - for those who live in large cities, it can be impossible to dig up worms before fishing, even in summer. What can we say about winter time! I have to buy it, but the prices for worms in winter become simply indecent. What remains for the city fisherman? Either catch with a comparatively cheaper bloodworm, or try breed worms at home.
Many people think that the process of breeding worms in a city apartment is a complicated and troublesome task; it is better to buy or catch them with bloodworms. But is it really that difficult to set up a worm farm at home? Let's try to figure it out.
Let's start with the question "what?" We have all encountered the problem of storing and transporting worms for fishing. If the trip is long enough, then, as a rule, this problem is solved simply: a plywood box or canvas bag with damp soil, worms are put in there, and, at best, they are fed with drunk tea or just dry leaves or grass. This method helps to preserve the bait for a week, maximum two, but it is completely unsuitable for breeding worms. The box rots and falls apart in a few months, but the bag wears out even faster. As a result, worms crawl across the floor, and a scandal with the household cannot be avoided.
It is better to use more durable containers for storing and breeding worms. These can be ordinary buckets or basins, either metal - not galvanized, but enameled - or plastic. There are also special containers on sale for breeding worms in garden plots. They are very convenient, but you can get by with simpler and more affordable means.
For some time I used buckets and basins to breed worms. But after I had a couple of aquariums empty of fish, I moved the worms there, and they have been quietly living and reproducing in the aquariums for more than two years now.
The productivity of worms is very high. Suffice it to say that, having a total volume of containers with soil of about 50 liters, I can weekly “harvest” worms in a volume of 1.5-2 liters, and at the same time the number of “brood stock” remains stable.
Contrary to popular belief, it is best to put soil in a container for worm breeding that is poor in humus. This is explained simply: the worms must be constantly fed, and the earth will soon be enriched with nutrients anyway. In addition, the soil in which the worms live must be mixed regularly, and the richer it is in humus, the more difficult it is to do this thoroughly enough. It is advisable that the soil used is free of roots and old leaves.
You should also not, as is sometimes advised, pour sand or crushed stone into the bottom of the container. This will only create additional difficulties when mixing. In addition - and this is more important - sand is generally contraindicated, since grains of sand can damage the worms' digestive system.
In general, regular mixing of the earth is a necessary condition for the normal well-being of worms. The point here is not even the uniform distribution of moisture and food throughout the container, but the fact that the worms, being in a limited volume, often tend to bunch up in dense groups, secreting specific mucus. Inside such a living ball, the temperature rises, breathing conditions worsen, and the worms quickly begin to die. To avoid this, it is advisable to mix the soil with your hands and, if you find such a ball, shake it thoroughly.
Another important issue is the issue of nutrition. Worms are surprisingly omnivorous, and they can be fed with all kinds of food waste: crumbled bread, the remains of various cereals, milk, kefir, cottage cheese - any food is suitable, as long as it is unsalted. If you want to cook specifically for worms, then the best option would be rolled oats. Moreover, it is not necessary to brew it - you can feed it dry, but you just need to take into account that dry rolled oats flakes take away moisture from the ground. Therefore, I do the following: I water the soil generously from a sprinkler, scatter dry rolled oats and mix it thoroughly with the soil.
You can feed the worms with bran. Bran is now not difficult to buy, and it is much cheaper than rolled oats. But you shouldn’t add dry leaves to the ground, as some authors advise. During the process of decay, the leaves are consumed a large number of oxygen, which is undesirable, and the process itself takes quite a long time. It’s not even worth covering the soil in the container with leaves on top. Under the foliage, the ground can dry out quickly, but it will not be noticeable from the outside. And during mixing, the leaves will fall into the soil, which is also undesirable.
For a 10-liter bucket of worms, 3-4 handfuls of rolled oats or bran are enough for a week. If, following my example, you decide to breed worms in a large aquarium, then the volume of food must be increased accordingly. But it is very important not to overdo it. If the worms do not have time to process all the food, then the remaining food quickly turns sour, an unpleasant odor appears, and the atmosphere in the apartment can deteriorate both literally and figuratively.
A vitally important task is to prevent the land from drying out. To do this, it must be regularly moistened with water. It is very convenient to use a “sprinkler” made from an ordinary plastic bottle. You need to make a dozen small holes in the cork through which water will flow in thin streams. It is necessary to moisten the soil very carefully - excess moisture, as well as its lack, can lead to the death of worms.
If you can feed the worms once a week, then you have to water and mix the soil more often - sometimes every 2-3 days. It is difficult to give an exact “schedule”, since it depends on many factors: humidity in the apartment, air temperature. If a lump of earth, squeezed in your hand, does not crumble, but at the same time water does not come out of it, then the humidity is suitable, and the worms will feel comfortable in such soil.
The first sign that there is not enough moisture in the soil is the drying out of the top layer. To prevent the soil from drying out longer, do not keep the container with worms in a dry and warm place; do not place it near radiators or various dryers. This is especially true during the winter heating period.
Creating a sufficient supply of worms at home is, of course, good. But we must strive to ensure that this supply is constantly renewed naturally. In other words, the worms need to not only live, but also reproduce. As my worm farming practice shows, this process can be accelerated by adding dairy products to the worms’ diet. This can be low-fat milk, kefir, cottage cheese. These products stimulate reproduction.
from one more source:
Earthworms- the general name of a number of the family of the class of oligochaete worms. Length up to 2.5 m, usually 3-15 cm, rarely up to 40 cm. About 1500 species, mainly in the tropics; in temperate latitudes there are 100 species. They live in the soil, are nocturnal, and crawl to the surface during the day after heavy rains. Soil formers.
The red worm is suitable for industrial breeding; it is possible to obtain in a short time a large biomass of vermiculture (worms), which is used to feed poultry, fish, animals, fur-bearing animals, and to obtain protein feed additives; the body of the worm contains 67-72% protein, 7-19% fat, 18-20% carbohydrates, 2-3% minerals, almost the entire set of amino acids that are not found in food of plant and animal origin, as well as biologically active substances.
In one growing cycle (3 months), up to 30 kg of worm biomass can be collected from 1 m2. When worms process 1 ton of organic waste (manure of all types of animals, bird droppings, food waste, straw, industrial wastewater residues, waste from the pulp and paper, wood processing, starch, fish and meat industries) in terms of dry matter, 600 kg of vermicompost is obtained, the remaining 400 kg of organic matter is transformed into 100 kg of complete protein in the form of worm biomass.
Worms process organic matter - manure or compost much faster and more completely than soil microorganisms during the composting process. Absorbing together with the soil a huge amount of plant residues, protozoan nematodes, microbes, fungi, algae, earthworms digest them, releasing together with coprolites (piles of earth secreted by worms) a large amount of humus, their own microflora, amino acids, enzymes, vitamins, and other biologically active substances, which suppress pathogenic microflora. At the same time, the organic mass loses its odor, is disinfected, acquires a granular form and a pleasant earthy smell. Another unique ability of worms is their ability to improve and structure the soil, penetrating it with their moves.
Habitat conditions for worms.
Nitrogen. The need of worms for nitrogen-containing organic matter is very high. In a nitrogen-rich substrate, the growth rate and fertility of worms increase sharply. Humidity. A particularly important condition for the life of worms is sufficient humidity. Humidity below 30-35% inhibits their development, and at a humidity of 22% they die within a week. When growing earthworms, the optimal humidity is 70-85%, i.e. close to the water content in the worm's body. Acidity. In an acidic environment below pH=5 or above pH=9, all worms die within a week. The optimal environment for worms is a neutral environment with pH=7. Temperature. As a rule, at a temperature of +5°C the worms empty their intestines and do not feed. They go into deeper layers of soil and go into hibernation. In spring, worms wake up 1.5-2 weeks before the soil thaws (disappearance of the frozen layer). Salinity. Salt concentrations of more than 0.5% are lethal to worms. However, worms tolerate increased concentrations of calcium carbonate, ferric carbonate, aluminum sulfate, and ferric chloride. Fertility. Each mature individual lays 18-24 cocoons during the summer, each of which contains 1-21 eggs. After 2-3 weeks, new individuals hatch from the eggs, and after another 7-12 weeks, the “newborns” themselves are able to bear offspring. Worms live 10-15 years, length reaches tens of centimeters. Young mature individuals weigh up to 1 g.
Technological worms
In the USA, as a result of breeding work, the red Californian worm was bred. It provides 18-26 fold reproduction in the local climate and 500 fold reproduction in special greenhouses, while wild relatives provide 4-6 fold reproduction. However, during the research it was found that for the industrial processing of any organic waste, worms obtained from local wild populations. This is very important, since it is very difficult to accustom worms to new food. This is due to their biological feature, which is that worms are programmed to digest food immediately after birth, and then cannot get used to other food. Therefore, buying technological worms is always a risk for the buyer. Colonization of new substrates is possible only with cocoons of worms. Hatched worms are tuned to process this particular type of food. Therefore, for gardeners, we recommend using local worms that are accustomed to the local climate, pesticides that do not contain foreign nematodes. Most worms introduced along with vermicompost into the soil of the garden or vegetable garden die.
Where can I get worms?
Look for worms in old manure heaps, in accumulations of last year's leaves. You can collect worms when digging the soil in the spring. There is a way to attract worms. In a raspberry field, maybe in a forest one, dig a groove to the depth of a spade bayonet, put last year’s compost in it, moisten it well and cover it with paper or burlap, and place a wide board on top. After 1-1.5 weeks, earthworms will appear in the groove, which can be collected in a bucket along with organic matter. For a worm-worm cultivator you need 500-1000 individuals per 1 square meter. meter cultivator.
Substrate for worms
Litterless manure is mixed with the same amount (by weight) of straw, hay, sawdust, etc. Compost for growing worms. Properly prepared, dense compost creates a breeding ground for worms. When caring for it, you can breed worms in winter. Using compost is a particularly practical way to obtain worms in dry areas. Compost should remain moist even in hot weather.
The place is chosen in the shade of deciduous trees or in hollows. A ditch 30 cm deep is dug in the ground. A well-compacted layer of clay 10-15 cm thick, rising to its edges, is placed on the bottom. It is recommended to cover the clay with a layer of chernozem or any other soil rich in humus. Future humus is placed on this layer in a dense layer, the best component of which is fallen birch leaves. If you prepare the compost in the fall, then in the spring you can collect worms from it.
Worm compost requires maintenance. It is necessary to monitor the processes occurring in it, add substances that accelerate decay, and especially when preparing for winter, make sure that it is dense and contains a sufficient number of components. A thick snow cover protects the compost from deep freezing, and in the spring it is easy to dig up worms in the thawed layers. Do not add coal and ash that are harmful to worms into the compost.
The types of worms and their location depend on the composition of the compost. If earthworms are grown in compost, it is not recommended to add manure to it. In leafy composts, the favorite places for crawling out are usually the edges of the pile near the surface of the ground, as well as where the foliage borders the ground. Highly valued by anglers, the vigorous purplish-red underleaves can be found in the upper, fairly warm and damp layers of the leaves. There are so many of them that with one grab of a fork you can collect worms for a day's fishing.
Compost containing manure has its benefits. Dung worms breed in abundance there and are easy to collect. The higher temperature of such compost guarantees the collection of worms for winter fishing. Dung worms are almost no different in appearance from subleaf worms. But they are more active and when attached to a hook they release a yellowish liquid with an unpleasant odor.
Cultivating worms in the garden
Find a place in the shade of trees, under a canopy, in a shed, in a basement, etc. In a box, in an old bathtub, just lay a 40-50 cm thick layer of compost on the ground in the form of a mounded bed. Moisturize well. Humidity is sufficient if 1-2 drops of moisture can be squeezed out of a lump of compost clenched into a fist. The size of the worm cage should not be large, 2 square meters is enough. meters. Cover the moistened substrate with burlap or straw and let it sit for 5-7 days to remove residual ammonia and dissolve fertilizer crystals. After 5-7 days, make a hole in the center of each square meter into which tip a bucket of worms located in their usual substrate. Level the surface, cover it with burlap or straw, and moisten it after a day. In hot weather, water like cucumbers with not too cold water. The worms should gradually get used to the new food. A week after moving in, see if the worms are moving to the new substrate. If the surface of the worms is clean, and they themselves are mobile, this is evidence of their well-being. If they are lethargic, inactive, and do not try to hide from the light, these are signs of trouble. Try to find a new population of worms from a different source and put them back into the cultivator. If the worms feel well, do not disturb them for 3-4 weeks, only periodically water the cultivator with ambient temperature water. Within 12-18 weeks, each worm lays a cocoon the size of half a grain of rice. Each cocoon contains 3-21 worm embryos. After 2-3 weeks, newborn worms emerge from the cocoons, only 4-6 mm long, which grow quickly and in 10-12 weeks increase their weight from 1 to 250-500 mg. Typically, young worms become sexually mature by October. During the summer season, their total mass in the worm cultivator increases by 20-50 times. For the reproduction and growth of worms, a lot of food is required. Therefore, it is necessary to periodically add food to the worm cultivator, layering 15-20 cm every 2-3 weeks, starting from the first days of June, for a total of 7-8 layers. The last layering should be carried out in late October-early November before the onset of frost. The height of the heap can reach 60 cm, therefore, in order to maintain the necessary humidity, the sides should be covered with boards. The worms are located in the cultivator mainly in the upper, “food” layer, about 20 cm thick. This layer is removed and used to populate a new batch of substrate. The lower layers are poorly populated and represent vermicompost. For the summer season per 1 sq. per meter of the worm house, more than 1 ton of compost with 50% humidity is processed and about 500 kg of vermicompost with 50% humidity and 6-10 kg of biomass of live worms are obtained.
Preparing worms for wintering
At the end of October-beginning of November, the upper part of the cultivator bed, abundantly populated with worms, is transferred to the surface of the earth of a neighboring plot and covered with a 40-50 cm layer of compost and decorated with boards on the sides. This cultivator bed should be well protected from rodents with a metal mesh or spruce branches. An old cultivator with worms can be well watered, which, when frozen, will make it inaccessible to rodents. At a temperature of 6°C, the worms stop feeding, at 4°C they empty the digestive tract and fall into a state of suspended animation. With the onset of frost they freeze, but this is not dangerous for them. With the onset of spring, the worms become active and need food, so the substrate must be prepared in the fall. Cultivated worms are very dependent on humans, and in the absence of food they die quietly.
Conditions for preserving worms in garden soil
The main enemy of earthworms is an unreasonable person.
Through unreasonable actions and pesticides, a person can destroy worms and destroy soil fertility. Do the following: - minimize the use of pesticides, worms are very sensitive to them; - use a pitchfork, not a shovel, for digging. Worms cut with a shovel die; - overcompaction of the soil destroys the worms, the soil must be loose. - the soil reaction must be neutral pH = 7. To neutralize acidity, dolomite flour and chalk should be added, and gypsum should be added to eliminate excess alkalinity; - the concentration of soluble salts should not be more than 0.5%. Ash is a caustic alkali, so use it carefully, with big amount water. - it is necessary to maintain sufficiently high soil moisture. Worms are not afraid of flooding.
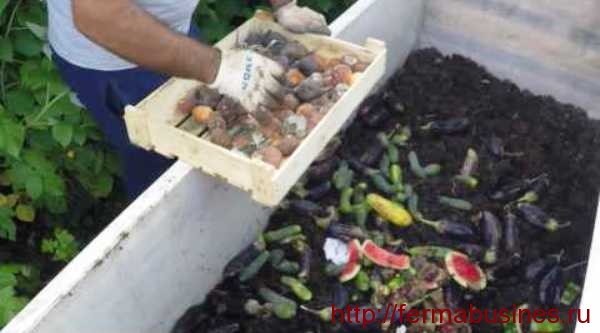
Do you have food waste? Potato or other vegetable peelings, moldy bread, fish bones, drunken tea, coffee grounds, anything else like that? For the first case, about two liters will be enough. Be sure to pass the waste through a meat grinder (except for tea and grounds, of course) and try to mix it all better. Spread the resulting mass in an even layer in the upper container on the surface of the ground.
Do not forget to periodically moisten the feeding and housing substrate. Worms love dampness. Within reasonable limits. It’s easy to determine: squeeze a lump of substrate in your fist (not with terrible force). If it crumbles, pour moderately warm water over the contents of the container. If moisture is squeezed out, refrain from watering.
Worms also love warmth. But not the heat. Room temperature is best. The light does not bother them, they do not crawl out into it, and if they accidentally get exposed to light, they immediately try to hide and go into the substrate.
Having arranged the worms in a permanent place, cover the containers with plastic film so that the top layer of the substrate does not dry out.
For better air exchange, periodically loosen the substrate. This is done using a fork that has served its main life.
If you don't collect enough food waste to feed, don't worry. Collect last year's fallen leaves, hay, pick fresh grass, chop it all; mix all the ingredients and feed us!
Wintering of worms
For the winter, it is necessary to cover the “wormhouse” with a half-meter layer of straw, since, unlike its Russian relatives, the Californian does not go deep into the winter and can freeze out if measures are not taken. Another serious danger to worms is mice and moles, which can eat 99% of the worms in a pile in a few days.
Entrepreneurial activities for breeding worms are characterized by a high level of profitability and low capital costs. Among other things, you can even do this at home or in an apartment (by allocating just one room).
In addition to the fact that worms themselves are a product of sale, they can provide additional income as fertilizer and worm tea, which significantly accelerate the development of plants.
This idea will be especially interesting as an additional business for gardeners, poultry and fish farmers. This production will perfectly supplement agribusiness with useful humus, and poultry and fish farms will be supplied with healthy complementary foods at cost.
Advantages of a business idea with minimal investment

The economic justification for breeding worms at home is due to the clear advantages of a profitable business with minimal investment.
Benefits of breeding worms:
- Simplicity of the equipment used.
- High rate of reproduction of individuals.
- The presence of a high level of demand, as well as ample opportunities to open new sales points.
- Minor ongoing costs for care and feeding.
- Waste-free production.
In just one year, an entrepreneur can receive more than fifteen thousand individuals and up to one ton of fertilizers (with a nursery size of 2 m2). Having made simple calculations, you can see that the net profit from the sale of 15 thousand individuals will be about $700. In addition, the profitability of this business can be increased by selling the collected ton of worm tea and humus. In today's economic situation, the profitability of breeding worms for humus production reaches 145%, which is an excellent indicator for such low initial costs.
Which worms are best for breeding?

Any type of worm can be used for breeding worms as a business. The most popular and cost-effective are the types presented below.
"Prospector"
Appears to be a key competitor of California red worms. "Staratel" is distinguished by its high ability to quickly process biomass into fertilizers. Characterized by high activity. One of the advantages of breeding this species is its high resistance to temperature changes; it can withstand from +9 to +30 degrees.
Earthworm
It is characterized by a high level of adaptation to the environment, which makes it an excellent tool for making a profit even in a city apartment. The only drawback of this type of worm is its low reproductive activity, which, however, can be compensated experimentally.
California (red) worm
To effectively and profitably breed California red worms at home, you need to maintain (at least) three families, each of which contains a thousand individuals. This species is characterized by a whimsical appetite for food (special food is required). Reacts sharply to temperature: the room should not be below +10. A distinctive advantage is high-quality humus.
Dendrobena
This type of worm was specially bred by farmers as bait when fishing. Despite the low level of reproduction rate and life expectancy, dendrobena are quite large and fleshy. Also, worm cocoons are able to withstand temperatures down to -18 degrees, after which they are hatched at a positive temperature level. Excellent for soil improvement and, as a result, may be of interest to companies involved in agricultural activities.
Muckworm
The advantages of this type of worm lie in its distinctive characteristics for vermicultivation. Previously it served as the basis for breeding such species as the Prospector and the Red Californian worm. Based on the dung worm, a new population can be developed, characterized by greater gluttony, growth and reproduction speed, depending on the needs of customers.
Mealworm
Like the others, this type does not require any specialized knowledge and significant capital to build a profitable business process. It is characterized by a high reproduction rate and resistance to temperature changes.
Helpful advice! It is worth noting that the natural habitat of one type of worm can be destructive for other species. For example, if an earthworm and a dungworm live together, the earthworm dies. Since the waste products of a dung worm are toxic to others. Keeping all types separately will reinsure the business against losses.
Conditions for breeding worms

Worm care consists of the following:
- loosening the soil;
- maintaining the required temperature range;
- timely feeding;
- watering the soil.
Almost all types of worms do not require special conditions for feeding. The temperature level, as mentioned above, should not fall below +9 degrees and rise above +30. Worms love moisture, but don't overdo it. The soil moisture level should not exceed 85%.
After the population has grown, the “extra” individuals should be moved to another container. Otherwise, the worms will stop reproducing. Also, after increasing the level of compost in the soil with worms, it is necessary to loosen it. In the vast majority of cases, this is no more than twice a week. Correct and timely loosening of the soil makes it possible to provide insects with the necessary access to oxygen, which has a beneficial effect on their reproduction rate.
Ways to sell finished products

The worm farming business has a wide range of marketing opportunities. For example, after reaching a sufficient number of individuals, you can safely establish contacts with various pet stores, as well as fish farms. Moreover, the geography of sales of finished products is not limited solely to one’s own city of residence. Using the Internet, you can find websites of pet stores in other cities. Recently, an online store has been an effective way to promote products sold.
Another, no less important method is direct sales in urban markets. One package of worms (thirty individuals) will cost on average $1-1.5.
As for humus and worm tea, this is an indispensable fertilizer for many gardeners and summer residents. By setting the average market price, you can quickly develop a significant customer base of retail buyers. You can find out more in this video.
An earthworm is an excellent bait for fishing. The usual habitat is soil. The benefits from them are enormous: a source of protein for birds, they perfectly loosen the soil, after which vermicompost remains, an excellent fertilizer for all types of plants. Almost all types of fish bite on this bait, and it sits tightly on the hook.
All fishermen, without exception, use the earthworm as bait. Quite often, especially in winter, fishing enthusiasts are tormented by the question of where to get such effective bait?
The answer suggests itself - dilute at home.
Breeding worms at home is not difficult. These individuals are unpretentious, very prolific, with proper care and feeding, during the season you can get up to 30 kilograms of worm from one square meter.
Worm box
- First of all, you need to create a home for them, this is suitable for box or plastic basin.
The place of residence for small residents must be chosen in such a way that they cannot crawl out of it. The height must be at least 40 centimeters.
- Drawer bottom should be drilled with a thin drill to release excess moisture.
- House placed in a container with sand, excess water will go there.
- The worms will feel great in an enamel basin, bucket or old pan; they will do well in an old aquarium.
Worms are very prolific. A mature individual lays up to 24 cocoons per season, from each up to 20 new representatives of the species are born. They, in turn, after 7 weeks can themselves bear offspring. If you consider that they live up to 15 years, it is incredible to imagine what a huge offspring they will produce.
Priming
To avoid mistakes, you need to know how to properly prepare the soil:
- Prepared containers To house the worms you need to fill it halfway with humus.
- You can add pieces of newspapers or cardboard, straw or dry grass.
- Moisten the prepared composition, this must be done carefully: if no liquid comes out when squeezing with your hand, then everything was done correctly.
- First time The humus will emit an ammonia smell; it is recommended to move in residents after it has completely evaporated (this will take several days).
Compost preparation
For high-quality cultivation of worms, it is necessary to properly prepare the composition for a comfortable stay:
- Wonderful compost there will be pet or bird manure. Manure must lie for at least 6 months before laying.
- Soil quality depends on the addition of leaves, food waste, and shells. You should not add potato peels to it.
- It wouldn't hurt to add lime and peat (at the rate of 1:5).
- Additives must be crushed, the processing process will go faster.
- Add feed should be given in small portions, because worms do not quickly get used to new food.
There is no need to add fresh manure to the soil; the worms may die. You should not use compost that has been sitting for more than 2 years: it contains very few nutrients.
How to catch more fish?
I have been active fishing for quite some time and have found many ways to improve the bite. And here are the most effective:
- . Attracts fish in cold and warm water with the help of pheromones included in the composition and stimulates its appetite. It’s a pity that Rosprirodnadzor wants to impose a ban on its sale.
- More sensitive gear. Reviews and instructions for other types of gear can be found on the pages of my website.
- Lures using pheromones.
Adding worms to compost
This process is the most important and requires special attention. The worms are brought in along with the nutritional composition and evenly distributed over the surface.
They take it directly from the ground or from a pile of rotted leaves in the garden or vegetable garden, or from the forest. It is best to do this after rain or in damp weather, when earth dwellers crawl out. It is better to collect them in large quantities; in the future, they will give a good increase.
For every square meter of compost, add from 750 to 1500 worms. They do not like bright light, so the box must be immediately covered with dark material that allows air to pass through.
These creatures lead an active lifestyle only in the dark. During this period they move, feed, and reproduce. During daylight hours they immediately hibernate, so you should not forget about this nuance.
If the inhabitants are inactive, very lethargic and do not respond to bright light, this is a sign that the compost was not prepared correctly, they got sick from pesticides from the new compost. In this case, you need to prepare a new composition, adding other components to it. However, such cases rarely occur.
How to breed earthworms at home?
With proper care, watering and feeding, raising worms at home is not much of a hassle. It is enough to prepare the soil correctly, feed and water on time, and the earthworms will do the rest themselves.
Worms are asexual individuals; they have no division into male and female. A characteristic feature is fertility.
The zonule (a noticeable thickening) is of great importance during reproduction..
When mating, the worms' belts are opposite each other. They press together, touching their belts, during the embrace, liquid (semen) is released, exchanged, and it ends up in the cocoon.
The worm wears this belt with a cocoon on itself for several days, and then discards it. The seminal fluid ripens, and there is discharge from the belt. The worm leaves its belt, in which the babies are located, and crawls away.
Worms are born that are exactly like adults. They just have very small sizes. The babies are very thin, their length is 4-6 millimeters. The worms become adults after 7-8 weeks and produce offspring themselves.
Worms, when threatened with extinction or extermination, reproduce without the presence of a partner. Unique ability - regeneration. If you cut or tear it into two parts, then each part will independently restore the missing one.
Now only mine bites!
 I caught this pike using a bite activator. No more fishing without a catch and no more looking for excuses for your bad luck! It's time to change everything!!! The best bite activator of 2018! Made in Italy...
Feed
Feeding should be constant and in doses sufficient to obtain all the necessary nutrients. What was laid down at the beginning will soon be insufficient for the development and adequate nutrition of the worms. You need to constantly add waste left over from cooking to your compost.
Feeding should be added once a week, starting with minimal doses. During the period of reproduction and active growth, add about three liters of nutrient waste to the soil daily.
- Worms feed on the peeled skins of vegetables and fruits.
- They willingly consume leftover tea leaves.
- They love various porridges and oat bran.
- Once a week you need to add about 300 grams of rolled oats to the soil.
It is imperative to remove the following products from the worm menu:
- Egg shells - they reduce the acidity of the soil.
- Potato waste.
- Citrus fruits should not be added.
- Eliminate dairy waste and fresh meat.
Watering the soil should be carried out only with settled water, if it is chlorinated, then for at least 4 days.
Care

When feeding and caring, it is necessary to observe Some recommendations that will help in breeding and propagating worms:
- Before feeding waste needs to be crushed, so it is eaten much faster.
- Feed, before adding it to the soil, it is necessary to mix it with it, this will eliminate the appearance of midges and make it possible to receive more nutrition.
- First feeding carried out a few days after entering the soil. Fresh food is applied to the soil surface and distributed to a thickness of 3-5 centimeters.
- During subsequent feeding the top layer is increased to 7 centimeters.
- Complementary feeding continues until until the container is filled to the top.
- The procedure for obtaining vermicompost stops when all the soil is completely processed by worms. This usually takes up to 4 months.
- After this time, the inhabitants need to be relocated to another substrate. To quickly adapt to a new place, they need to be moved with a piece of the old soil in which they lived and got used to it.
- Do not leave bait on top of the soil, it will dry out, and the worms will not receive the necessary substances required for growth.
- You should not feed them dry food., if it gets into the soil, it can quickly dry out.
- To ensure that the inhabitants receive sufficient oxygen, the soil should be loosened.
- It is necessary to carry out loosening, pierce the soil with a wooden stick. This procedure should be carried out at least 2 times a week, to the depth where the worms lie.
- Flip layer compost is not recommended.
Watering
Worms need moist soil, so you can't stop watering the soil. They sense fluctuations in humidity and react painfully to it. The optimal percentage of moisture is 80%.
Do not use water taken from a water tap for irrigation. It should stand for 3 days and its temperature should be at least 24 degrees.
It is best to water from a watering can with small holes in the strainer. It is also not recommended to over-water the soil..
Temperature

The temperature of the soil where the worms are kept must be regulated and not fall below 4 0 C.
The inhabitants of the compost are inactive during this period, because under these conditions they hibernate. If it rises to 36 0 C, then the worms may die from the heat.
The most optimal temperature for growth and reproduction is 24 degrees. It is necessary to strictly monitor not only the amount of complementary foods, but also the constant moisture of the soil.
The best option is to create a greenhouse effect: this means wet soil and a comfortable temperature.
Settlement
After the worm houses are completely filled with substrate, and the number of inhabitants has increased noticeably, you need to take care of their resettlement and making new soil.
For this purpose, the houses where the new residents will “move” are being prepared anew. Laying the soil is done similarly to the first method.
Conclusion
Worm farming can be used for a variety of purposes. In addition to the fact that they are grown as an excellent bait for catching fish, the grown individuals can be released into the garden, which is characterized by hard soil. Over time, the worms will loosen the soil on the site and leave behind an excellent fertilizer - vermicompost.
Dilution can be used for commercial purposes. Vermifarms are being created where the cultivation of individuals is literally put on stream.
Businesses that professionally engage in this business are very profitable: from one cubic meter of soil you can get 10 thousand representatives of the species, they, in turn, will produce up to 500 kilograms of vermicompost, an indispensable fertilizer for planting vegetables.
This kind of business is practically a win-win. The creation of any farm will require many times more financial investments.
The risk of the enterprise becoming bankrupt is reduced to zero. Worms will be actively purchased by amateur fishermen as bait, and processed compost - vermicompost - will be gladly purchased by summer residents to fertilize their favorite plants.
How long has it been since you had a really BIG CATCH?
When was the last time you caught dozens of HUGE pike/carp/bream?

We always want to get results from fishing - to catch not three perch, but ten kilogram pikes - what a catch! Each of us dreams of this, but not everyone can do it.
A good catch can be achieved (and we know this) thanks to good bait.
It can be prepared at home or bought in fishing stores. But stores are expensive, and to prepare bait at home, you need to spend a lot of time, and, to be fair, homemade bait does not always work well.
You know that disappointment when you buy bait or prepare it at home and only catch three or four bass?
So maybe it’s time to use a truly working product, the effectiveness of which has been proven both scientifically and in practice on the rivers and ponds of Russia?
It gives the same result that we cannot achieve on our own, especially since it is cheap, which distinguishes it from other means and there is no need to spend time on production - you order it, it’s delivered and you’re good to go!

Of course, it is better to try once than to hear a thousand times. Moreover, now is the season! This is a great bonus when ordering!
Find out more about the bait!
Nowadays, many, looking for an affordable and profitable business for themselves, settle on the option of breeding earthworms at home. To help such novice entrepreneurs, this article has been written, which describes in detail how to breed earthworms.
Many people know that the soil is made fertile by the most common worms, which crawl to the surface after the rain has passed. In particular, they are the ones who process organic residues into humus.
In the West, the worm business has been appreciated for a long time and even new breeds have been developed that reproduce and work much more productively than their own relatives. But at the same time, in some aspects they are a little more demanding of conditions.
Which ones to choose
Still, start breeding worms, i.e. It’s better to gain experience not on overseas thoroughbreds, but on ordinary ones, our rain ones, for which it is much easier to create conditions. They get used to moving to new conditions very well and begin to multiply quickly.
To start a business in breeding earthworms, you don’t have to buy them, but collect them yourself.
This is not difficult to do. There is no need to dig up hectares with a shovel to collect the required amount. Simply dig a small hole and pour rotted leaves or manure into it. We water it from above and cover it with boards or a regular cardboard sheet. Don’t worry, within a few days the first worms will begin to appear in it. It should be noted that they need to be moved to new conditions with the soil in which they were previously located.

It is estimated that to start breeding, about a kilogram of earthworm is needed per square meter of nursery, which is about a thousand specimens.
Where is the best place to breed?
There are no special conditions for choosing a room for organizing a farm; the main thing is that its area should be such that it is convenient and comfortable for you to work. It is advisable that the room be heated. You need to know that if the temperature drops to +4 degrees, then your charges will first decrease their activity, and then they will simply fall asleep. As a result, your business will completely stop. If you are going to breed earthworms all year, then the area of the premises should be larger, since the population will constantly grow.
Earthworms are bred in boxes. You can buy them, or you can knock them down yourself. Although this option is more troublesome, it has the advantage that you can make boxes of sizes that are better suited for your room.
Making boxes yourself
Made of wood
A similar box is made from boards (optimal thickness) 2.5 centimeters. Practice has established that the optimal sizes are as follows:
- width 1 meter;
- length 2 meters;
- height 0.5 meters.
We drill holes in the bottom and install the box on bricks or some kind of blocks. It must be installed at a slight angle. This is necessary so that the accumulated liquid (which is of great value) does not stagnate, but can drain. The corners need to be covered with tin. The top of the boxes must be covered with a lid; a plywood or cardboard sheet will do, but you can also put them together from boards.
Plastic box
You can move on to breeding in such boxes at the next stage of breeding, when you gain experience. We do not recommend starting with them because they are not cheap, and if, after trying yourself in this business, you decide that this is not your thing, you will be very sorry for the money spent. Like wooden boxes, plastic ones should have ventilation holes and should be installed at an angle.

Plastic box
Non-working refrigerator
Many, even experienced breeders, practice breeding worms in old, no longer needed refrigerators. It needs to be placed with the door facing up. We remove shelves and containers immediately, but do not throw them in, they may come in handy later. We drill ventilation holes in the walls and door. We place it on bricks or bars under a small slope.
Cardboard box
Breeding and growing earthworms in cardboard boxes can be called the best option for those farmers who are just starting out. The minimum dimensions of such a dwelling for worms should be 40x30 centimeters. The main advantage of cardboard is that it is usually made from natural materials and is highly breathable. Worms often feed on it. The disadvantages include the fact that this material cannot boast of durability. When you see that the box is becoming unusable, do something simple, namely, put it in a new one, and the old one will be eaten by worms.
Specialized vermicomposters

Of course, this is the best option and is most suitable for breeding and growing worms, both at home and in a large enterprise. The disadvantage is that such worm houses are quite expensive and therefore can only be recommended to farmers with experience.
This video explains how a factory-made vermicomposter works.
How to fill a nursery
In the box in which you plan to breed the worm, you need to pour humus, which can be mixed with paper or cardboard for nutritional value. Next, be sure to thoroughly moisten the resulting soil.
Attention! Under no circumstances should you immediately introduce worms into fresh soil. Wait a few days for the ammonia to evaporate.
It is necessary to populate at the rate of one kilogram of worm per square meter of soil. Before moving in, you need to dig a small hole in the ground and place the worms there along with the old soil. Next, this place needs to be leveled and moistened. Cover the box with a cardboard lid.
The worms should not be disturbed at all for several days. They must get used to new conditions and get used to the new soil and confined space.
If the worms have spread all over the box, then consider that acclimatization was successful and they can be fed.
Water the soil regularly, but in moderation. Soil that is too wet is just as dangerous as soil that is too dry.
The place where worms are bred must be quiet and no vibrations are allowed.
What to feed
You can feed worms with various wastes that are found in any kitchen. At first, you will have enough waste from your table. Later you will have to think about increasing the food supply. Perhaps you can arrange to have the leftovers from some canteen or cafe given to you. Under no circumstances should dog or cat droppings get into worm boxes.
The prepared food is laid out in a ten-centimeter layer, approximately once a week. Farmers have come up with a simple way to determine when it's time to feed the worms. After the food is laid out, paper or cardboard pieces are placed on top. If you see that the worms have begun to feed on them, this means that it is time to feed your charges.
Reproduction of worms
The worms become sexually mature at about three months and begin laying cocoons, which take several weeks to mature and about two dozen small worms emerge from it. Which, in turn, after a few months they themselves are ready to give birth to offspring.
This is interesting! Within six months, the number of worms can increase by more than fifty times!
Overpopulation should not be allowed, and if there are more than fifty worms in one liter of soil, then you should think about relocating them or selling them.
Overpopulation negatively affects not only the well-being of the worms, but also completely stops their reproduction.
Sort worms every four to six months. To do this, take the top layer of soil from the nursery and move it either into a separate container or simply move it to the side. Then the middle layer, in which the worms are located, and then the humus, is removed. Next, the worms need to be sorted. We select the big ones for sale, and send the small ones back. Also, some of the adult worms can be left or moved to new breeding boxes.
Implementation
A novice farmer may be a little confused, not knowing where to sell the worms. We will offer several options.
- Sales direct to fishermen. This option is good because you can sell the product at the highest price, working directly with the end consumer.
- Zoological shops. Quite a good option, because... Worms are fed not only to aquarium fish, but also to birds and even some animals.
- Farms specializing in fish breeding. If you can establish contacts with such people, then you don’t have to worry, large sales volumes are guaranteed.
- Sales of humus. This is a very valuable product that significantly increases the yield of various crops. Buyers can be gardeners or farmers.
- Vermichai is an extremely valuable product that can be used to increase the yield by more than 2 times! Buyers are not only summer residents or farmers, but also various greenhouses or those who keep their own greenhouses.
Profitability of the worm business
If you organized everything correctly, then even a very small farm can produce about twenty thousand worms and about one ton of vermicompost. And this is from just two square meters of the nursery. Plus there is also profit from the sale of vermicelli and vermicompost. As you can see, the benefits are more than obvious!
When breeding worms at home, do not forget about their natural habits. If the conditions for the worms' existence are properly organized, the soil in the box will soon be divided into three layers. The first is the layer in which your charges feed, the second is the place in which they spend most of the time. And the third, the lowest one, humus and vermicelli will accumulate in it.
This video shows what to feed worms at home.
